Tag: Crafts

Creative Jewelry Organization Ideas

It is a very common occurrence in my house to have a lack of organization in the jewelry department.  My necklaces are always in a knot and I am notorious for only knowing where one earring is.  If you are in the same boat, I hope this post will help you with one idea or the combination of a few to make jewelry organization cute as much as it is practical.

jewelry6

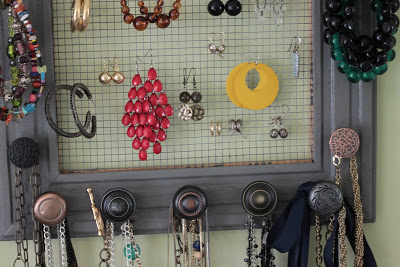
Picture frame & Chicken wire

This is pretty easy.  Mount chicken wire with a staple gun onto the back of a picture frame.  Add knobs at the bottom of the frame for added storage.


jewelry1

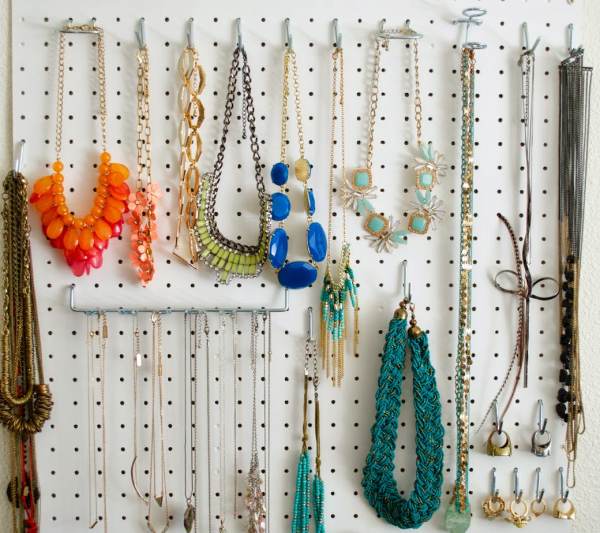
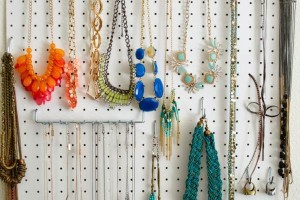
Peg board jewelry organizer

This one is pretty simple!! You will have to buy the desired amount of peg board and hooks.  Mount the pegboard on the wall as in the instructions, hang your pegs and hooks, and hang your jewelry and you are set!! Organize and reorganize because this is a pretty versatile set up!

Veršffentlichung nur gegen Honorar (zuzŸgl. MwSt), Namensnennung und Beleg. Bauer Living GmbH, Redaktion deco&style, Burchardstr. 11, 20067 Hamburg, Tel. 040/3019-4997, Fax 3019-4986, E-Mail: deco-style@bauerredaktionen.de, http://www.decoundstyle.de

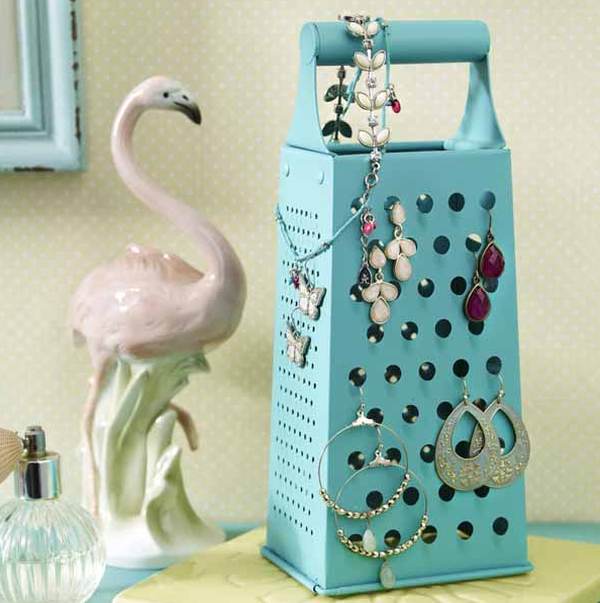
I thought this is so cute for a more vintage look! Spray paint a stand up cheese grater with the color of your choice and let dry.  Hang your earrings in the holes and rest your necklaces on top!

Veršffentlichung nur gegen Honorar (zuzŸgl. MwSt), Namensnennung und Beleg. Bauer Living GmbH, Redaktion deco&style, Burchardstr. 11, 20067 Hamburg, Tel. 040/3019-4997, Fax 3019-4986, E-Mail: deco-style@bauerredaktionen.de, http://www.decoundstyle.de

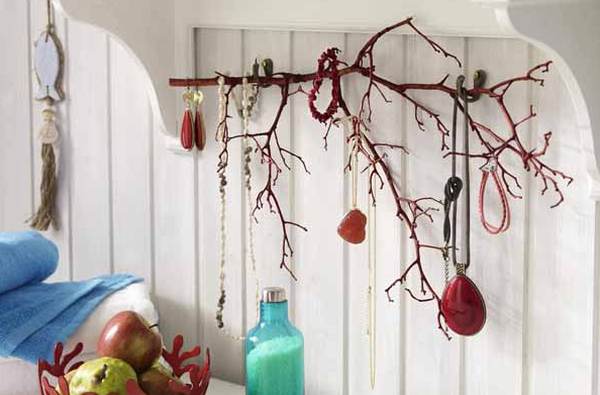
Here is a very non expensive idea! Find a twig that you really like and mount it on the wall with small hooks and hang your jewelry on the twig! This one is my favorite idea!

jew7

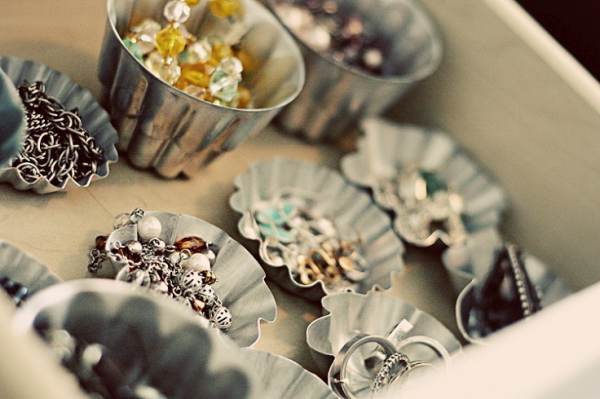
This idea can be a little more on the pricey side but I think it is so cute. You can use small pastry molds for your jewelry in your drawers.  Organize by color, size, or style and you are set!!

Lemon Sugar Scrub DIY!

scrub

Lemon Sugar Scrub DIY!

Sugar scrubs can be so pricey at your local stores! So, why not make your own at home? It’s simple, inexpensive, and only takes 5 mintues! My family tried this recipe below, this weekend and loved it! Ingredients:

  • ¼ c. Coconut Oil (melted)
  • ¾ – 1 c. granulated white sugar
  • 2-4 drops yellow or red food coloring depending on which batch you make
  • 10-15 drops Lemon Essential Oil or 10-15 drops Raspberry or Vanilla Extract

This Lemon Sugar Scrub will make a great gift and a treat to yourself or others! Let us know how yours turned out, we love to hear from our readers. For additional directions on how to make this scrub, visit the Reason To Skip The Housework Webpage!

Easy DIY Pom Pom Garland

I think this is the CUTEST look! You can use this to decorate for any holiday, birthday, or bedroom.  This DIY pom pom garland is such a great look year round. I have found a easy tutorial to help you get started.


pompom

pom3


Supplies:

  • Wool or Yarn in various colors. We used pink, dark pink and white.
  • Wool to string your pom-poms onto – you might like to use twine or embroidery thread
  • Sharp scissors
  • Fork
  • Darning needle

First thing to do is to make your pompoms. I enlisted my daughters help and we both got busy and made a bunch of pom-poms. Unfortunately I ended up making all the pompoms on my own as my little helper would only make them if they were in her favourite color blue, she wouldn’t go anywhere near the pink.

Making pompoms is pretty easy as you can see from our little ‘how to make a pom-pom’ guide below.

Instructions to making a basic mini pom-pom:

  1. Basically, you take your yarn and wind it around the tines of your fork. About 50 to 90 times depending on the thickness of your wool.
  2. Cut a length of yarn about 10cm long.
  3. Tie the length of yarn tightly around the center. (I like to tie it once as tight as I can, but before I knot the length I slip the pompom off the fork and then pull the length tighter again. Then I complete the knot)
  4. Take your sharp scissors and cut through the loops.
  5. Now you need to tidy up your pompom with your scissors. You will take off quite a bit of wool so don’t worry too much if it feels like you’re trimming more than you should.
  6. Stop trimming when you have a nice round shaped ball.

Assemble your Pom-pom Garland

When you have made at least a dozen pom-poms, use a needle and thread to thread them onto a length of yarn spacing them evenly. For these sized pompoms I like to leave a gap of around 12cm between each one. Ensure that you leave approx 30cm of yarn at each end for hanging.

These garlands are really versatile and you can use them to brighten up any room. After the party you can reuse it to dress your window, mantle, walls. A Christmas themed garland would look fantastic on your Christmas tree.

thanks, Jellyfishprints!

Washi Tape Mini Wood Pallet DIY Coasters!

Washi-Tape-Mini-Pallet-craft

Washi Tape Mini Wood Pallet DIY Coasters!

My husband and I love to collect different nerdy mugs and glasses. Every time we visit somewhere, we buy a mug from that state or country. So, my husband and I searched for a inexpensive coaster DIY idea and found one! Your guests will absolutely love these and ask how you made them! Here’s what you’ll need to make your own:

  • wood craft sticks
  • 1/2″ square balsa wood rod (look in the wood section at your hobby store)
  • pliers with wire cutting blade
  • craft knife
  • sand paper
  • hot glue gun
  • washi tape
  • scissors
  • Mod Podge

Let us know what you thought of this DIY and how yours turned out! This is such a cute craft idea, so do not miss out.  For additional directions on how to make this coaster, visit the Washi Tape Crafts Webpage!

Pineapple Facial Scrub DIY!

item

Pineapple Facial Scrub DIY!

Do you have large pores on your face? I know that I do! Buying cremes and medicines can be pricey, especially if they are prescription. I am allergic to many of the chemicals in these cremes both prescription and over the counter. So, I tried this DIY and it totally worked! Plus, there are only three inexpensive ingredients! Ingredients:

  • 1/2 Cup of Crushed Pineapple
  • 1/2 Cub Cornmeal
  • 2 Tbsp Jojoba Oil

Let us know what you thought of this Homemade Pore Minimizer and how it worked! For additional directions on how to make this homemade remedy, visit the EHow Webpage!

Fairy Playdough Recipe! Fun For Kids!

dough

Fairy Playdough Recipe! Fun For Kids!

Are you looking for a fun craft to do with your kids over the weekend? If so, you have to try this Fairy Play-dough Recipe! It is so easy and there are only three ingredients that you’ll need. This is very inexpensive and colorful, your kids will absolutely love it. I know, because mine did!  Ingredients:

  • 1-2 Drops of Pink Food Coloring
  • 2.5 Cups of Cornstarch
  • 1 Cup Hair Conditioner

You can choose other ingredients to make this more fun like glitter or fairy figurines. Let us know what you thought of this play-dough, we love to hear from our readers. For additional directions on how to make this fun craft for kids, visit the Laughing Kids Learn Webpage!