Tag: Crafts

Easter Egg Mason Jars DIY!

jar

Easter Egg Mason Jars DIY!

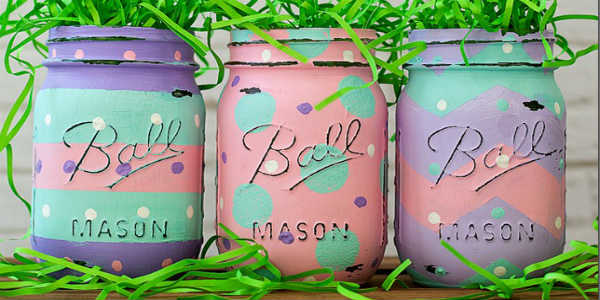
A few weeks ago, we posted a mason jar DIY that was a huge hit with our readers. So, I found another DIY that I think our readers would also enjoy! You can make Easter Egg Mason Jars. Isn’t that great?! I’ve never thought of this idea for decor, but it is genius. I am going to make this craft before the upcoming holiday. You’ll need the following supplies:

  • Americana Acrylic Paint (or whatever brand you prefer)
  • Mason Jars
  • 80 Grit Sandpaper
  • Paint Brushes
  • Paint Tape

Are you planning on making this? If so, let us know how it turned out! For additional directions and details, visit the Mason Jar Crafts Love Webpage!

Homemade ‘Oreo’ Cookies Recipe!

cookies

Homemade ‘Oreo’ Cookies Recipe!

If you are like me, then nothing beats the taste of Oreo cookies and some milk! However, paying over $3.00 for cookies that won’t last more than a few days can be troubling to your budget. If you want a different alternative to these cookies, then check out this recipe for homemade ‘Oreo’ Cookies. You’ll need the following:

For the Dough:

  • 1 1/3 cups Dutch-process cocoa powder
  • 1 1/2 cups all-purpose flour, plus more for dusting
  • 1/4 teaspoon salt
  • 2 sticks unsalted butter, softened
  • 2 cups granulated sugar
  • 2 large eggs
  • 1 teaspoon vanilla extract

For the Filling:

  • 1 stick unsalted butter, softened
  • 1/2 cup vegetable shortening
  • 3 cups confectioners’ sugar, sifted
  • 1 teaspoon vanilla extract

Let us know what you thought of this recipe and how it turned out! We love to hear from our readers! For additional directions on how to make this sweet treat, click here!

Pizza Cupcakes Recipe!

pizza

Pizza Cupcakes Recipe!

Hey guys, do you need a fun recipe to make with your kids? Then bake some Pizza Cupcakes, because it’s an easy Betty Crocker recipe without a huge mess. I have actually made these with my children and they are very inexpensive and fast! So, do not miss out on this delicious recipe that is family friend. You’ll need:

  • 1 can (8 oz) Pillsbury refrigerated crescent dinner rolls
  • ½ cup Muir Glen organic pizza sauce
  • ¼ cup mini pepperoni slices
  • ¼ lb mild Italian sausage, cooked and drained
  • ½ cup shredded mozzarella cheese (2 oz)

For additional details on how to make this easy dinner, click here!

Pistachio and Chocolate Leprechaun Cookies Recipe! These Sound Amazing!

cookies

Pistachio and Chocolate Leprechaun Cookies Recipe! These Sound Amazing!

Saint Patricks Day is next Thursday, so our family has been planning some fun recipes for the day! So, I’ve been looking up recipes and these Pistachio and Chocolate Leprechaun Cookies look amazing! My husband is a big pistachio fan and I’ve never used them in cookies! Here’s what you’ll need:

  • 1 cup butter, softened
  • 1/2 cup granulated sugar
  • 1/2 cup light brown sugar
  • 1 teaspoon vanilla extract
  • 1/2 teaspoon almond extract
  • 1 (3.4 ounce) package instant pistachio pudding (dry mix)
  • 2 eggs
  • 2 1/4 cups cups all-purpose flour
  • 1 teaspoon baking soda
  • 1/4 teaspoon salt
  • 1/2 cup dark chocolate chips
  • 1/2 cup green M&Ms
  • 1/2 cup chopped walnuts
  • green food coloring *optional

How did your recipe turn out? Let us know, we love to hear from our readers! For additional directions on how to make this sweet treat, visit the I Heart Naptime Webpage!

DIY Wine Cork Mat

winecork

DIY Wine Cork Mat

This mat can be used both in the bathroom and entry room. Cork absorbs water so it is great for both of these rooms. You can make use of all the corks from your wine bottles and ask your friends to save theirs too.

  1. Gather the corks. If you’ve been collecting corks, check that you’ve got enough, as you’ll need around 150 to 200. If not, additional corks can be purchased from brewing or wine-making suppliers, craft stores or through online retailers. Also check your local thrift store as sometimes they get people’s collections of old corks. If using used corks, check that they’re clean. They should be free of dust, wax or any build-up. Warm soapy water is best for cleaning them––just ensure they’re thoroughly dry before beginning the craft project.
    • For wine-stained corks, simply soak them overnight in a bowl of water to which you’ve added a touch of bleach. This should remove the wine. Rinse clean, and allow to dry thoroughly before using.
  2. Slice each cork in half, lengthwise. Be especially careful not to slice your fingers when doing this. It helps to wear work gloves during this part of the process and lay down a non-slip surface for the cutting board to sit on, such as a silicon map, before beginning. Take plenty of breaks, as there are a lot of corks to get through––grab a friend to help if possible. To slice the corks in half:
    • Stand the cork up on the cutting board or cardboard, then cut downward. Hold the top of the cork with your finger and slice it neatly in half.
    • Sand the sides of the cork if they become too jagged. Gently run the sandpaper down the sides and along the middle to ensure a smooth, clean surface.
  3. Create the bathmat base. Use a plastic shelf liner or shower mat to serve as the base––a previously designed rubber shower mat may be the best option, as it will provide structure. However, your mat will be more flexible if you choose to use a plastic shelf liner. A more solid alternative can be to use a piece of water-resistant wood, like marine-ply (or wrap the wood in plastic or oil it––the latter option may make gluing hard though).
    • Determine the size by either using another shower mat as the guide or measuring the custom size you desire. Consider your bathroom dimensions when determining size.
    • Cut the liner using either the box cutter or the sharp knife. If you need to size the base, use a ruler or straight edge to mark areas to cut.
    • Lay the shower mat or cut shelf liner down flat on the floor or on another flat surface. Cut the liner or mat either on a work table or on an outside patio so you don’t slash your floor or any furniture. Placing a self-healing cutting mat underneath can be helpful.
  4. Arrange the cork halves around the perimeter of the line or mat. Begin by creating a border with cork halves lining up vertically along the edges of the mat:
    • Line the corks up so the bottom of each cork (end) butts up to the sides of the mat or liner.
    • Complete the entire perimeter of the mat with corks until the entire mat/liner has been lined with corks. If you don’t achieve a perfect fit, cut some of the corks to fit.
    • Apply hot glue to the flat half of each cork and press the cork into the liner or mat. Use a dab of glue at the top and bottom of each cork and press firmly into the mat. Use a rag to wipe any excess glue that may ooze out from beneath the corks.
  5. Add the remaining corks to the mat. Create a pattern or design with the cork layout, working your way from the outside inward with the remaining cork halves. Continue either with the vertical pattern or consider laying corks in a horizontal fashion and then alternating for each surrounding row.
    • It’s probably a good idea to lay out the cork halves first to determine a pattern and then glue the corks to the mat after you’re sure they will all fit. That way, you won’t start your mat and then get stuck if your pattern doesn’t work out or if you don’t like they way it looks.
    • Trim corks if needed to accommodate the size of the mat/liner. Keep your knife/scissors handy in case you need to customize cork size.
  6. Allow to dry completely before using. It might be a good idea to apply a coat of protective sealant such as polyurethane or cork sealant across the top of the cork bathmat, to waterproof it. However, corks can withstand small brushes with liquid (after all, they are in wine bottles a lot of the time), provided they’re not constantly soaked. You might find the mat lasts okay if you don’t end up with a floor awash with water each use and if you drop a small hand towel over the top of it before stepping on it from the shower. On the other hand, as with all bathroom items, there is a risk of mildew growth over time. This can possibly be avoided by placing the mat up somewhere that allows air circulation to dry it, and leaving it in the sun once a month or so, to ensure it dries out well. Whether or not you add a sealant is really a personal choice, and you might like to ask your local eco-hardware supplier if there are some eco-friendly choices for sealants available.

Make an Earphone Holder! So Genius!

diy

Make an Earphone Holder! So Genius!

Do you listen to music with your earphones on a daily basis? If so, we have a genius DIY to show you! You can make an earphone holder with an old mint container. Isn’t that great? I am going to make this DIY project pronto, because it can clip on your purse or gym bag. You’ll need:

  • Fabric or Scrapbook Paper
  • Mod Podge
  • Key Chain Link & Fastener
  • Goo Gone Spray (to remove any sticker residue)
  • Drill
  • Cup/Lid/Bowl (to cut fabric circle)
  • Scissors
  • Empty Mint Container

Let us know how your project turned out and what you thought! I am super excited for this project! For additional directions, be sure to visit the Make It Love It Webpage.

Cookies And Cream Popcorn Recipe!

popcorn

Cookies And Cream Popcorn Recipe!

Love popcorn and want something sweet today? If, so make this delicious Cookies And Cream Popcorn Recipe! I’ve made this exact recipe with my family and they’ve loved it, so do not miss out. I know that I’ll be making it again, because it is so easy and inexpensive. Ingredients:

  • 9 cups popped popcorn
  • 20 Oreos, finely crushed
  • 24 oz. White Vanilla Almond Bar

Let us know what you thought of this recipe, we love to hear from our readers. For additional directions on how to make this tasty treat, click here!