Rice Crispy Treats are always so much fun to make and eat. I have gathered 5 recipes that gives a creative twist on the average Rice Crispy Treat. All the ideas are Easter themed, no bake, and all are pretty easy to make. Use these for a dessert for a party or an activity to do with the kiddos. I can’t wait to try the Cadbury Egg Rice Crispy! Send me pictures (via Facebook msg) if you make any of these, I would love to see them!
Easy Easter Cookies
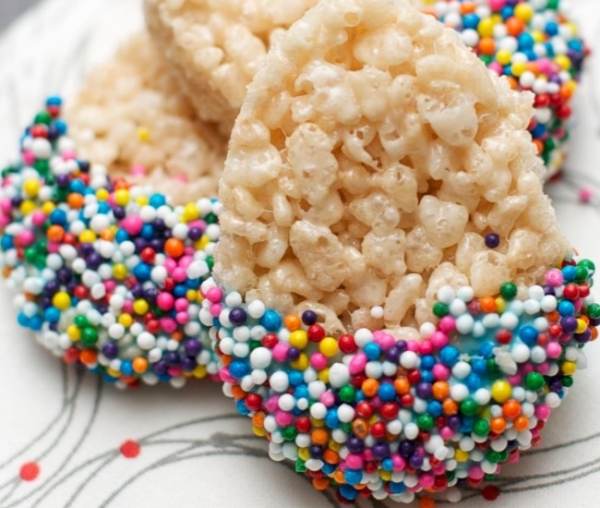
Ingredients
- 3 tablespoons of butter or margarine
- 1 package (10 oz., about 40) regular marshmallows
- 4 cups of miniature marshmallows
- 6 cups of Rice Krispies
- ½ cup of turquoise candy melts
- candy sprinkles
- easy kids easter party food sprinkles
Directions
1. In a large saucepan, melt butter over low heat. Add marshmallows and stir until completely melted. Remove from heat. Add cereal. Stir until well coated.
OR
1. Microwave butter and marshmallows on HIGH for about 3 minutes, stirring after 2 minutes; stir until smooth.
2. Pour the mix into a 9 x 13 x 2 pan that has been coated with cooking spray. Put a sheet of parchment paper over the mixture (to keep from sticking) and roll it out until it is about ½ thick.
3. Use an egg-shaped cookie cutter to make egg shapes (periodically dip the cookie cutter in water to keep the marshmallows from sticking to it).
4. Lay the egg shapes on a cooling rack until theyre firm enough to handle.
5. Heat the candy melts in the microwave in a small bowl. Dip one end of the eggs into it.
6. Return to the cooling rack momentarily, with a cookie sheet underneath to catch any drips.
7. Dip the treat ends into sprinkles and return to the cooling rack until theyre firm.
For best results, use fresh marshmallows.
1 jar (7 oz.) marshmallow crème can be substituted for marshmallows.
Diet, reduced calorie or tub margarine is not recommended.
Store no more than two days at room temperature in airtight container.
To freeze, place in layers separated by wax paper in airtight container. Freeze for up to 6 weeks. -Let stand at room temperature for 15 minutes before serving.
Kellogg’s Rice Krispies Hidden Surprise Easter Egg Treats

Ingredients
- 3 tablespoons Butter or Margarine
- 1 package (10 oz., about 40) regular Marshmallows OR 4 cups of miniature Marshmallows
- 6 cups Kellogg’s Rice Krispies Cereal
- ½ cup M&M’s Brand Chocolate Candies (plus some for snacking)
- Canned frosting or decorating gel (optional)
- 12 plastic snap-apart 3×2-inch Easter eggs
Instructions
- Thoroughly clean Easter eggs then coat inside of plastic eggs with cooking spray. Set aside
- In large saucepan, melt butter or margarine over low heat. Add marshmallows and stir until completely melted. Remove from heat.
- If your saucepan is large enough, add Kellogg’s Rice Krispies cereal and stir until well coated. If your saucepan is not big enough, add Kellogg’s Rice Krispies cereal to a large bowl and pour marshmallow mixture on top, stirring until well coated.
- Using greased hands, firmly press ¼ cup of cereal mixture into each plastic egg half. Use fingers to make hollow center in each half. (TIP: Use a rounded tablespoon measuring spoon and press firmly in the center of each egg. This will make hollowing out the center much easier.) I used a mini muffin pan to hold the egg halves upright while I was finishing the whole batch.
- Once the eggs have set, remove from molds and place on wax paper.
- Place about six M&M’s in each egg half. Gently press two halves of each egg together until they stick.
- You will have to have patience and keep pressing and molding around the seam.
- Let cool completely and decorate with frosting and M&M’s, if desired. I used melted semi-sweet chocolate and sprinkles for ours.
Marshmallow Peeps in Crispy Nests
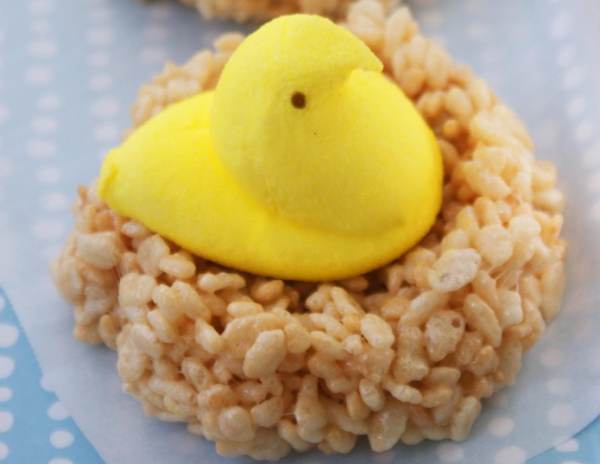
Ingredients:
- 12 PEEPS® marshmallow chicks
- 6 cups crispy rice cereal
- 3 Tbsp. butter or non-hydrogenated margarine
- 4 cups miniature marshmallows or 10 oz. regular marshmallows
Directions:
- In a medium saucepan, melt butter over low heat. Add marshmallows and stir until completely melted. Remove from heat, add cereal and stir until well coated.
- Scoop out a handful of the mixture and shape into nests with lightly dampened hands. Set on a parchment-lined sheet, press a PEEPS® chick into each nest, and let them sit until set. Makes a dozen.
Coconut Cadbury Rice Krispies “Scotch Eggs”

Ingredients:
- 4 Cadbury Creme Eggs, refrigerated overnight and unwrapped
- 2 tablespoons butter
- 2 3/4 cups crisped rice cereal (Rice Krispies)
- 1/4 cup sweetened or unsweetened dessicated coconut
- 24 marshmallows
- sprinkles
Instructions:
- Melt butter over low heat in a large pot.
- Add marshmallows and stir until nearly completely melted. Removed from heat and stir in cereal and coconut.
- Quickly and carefully cover each egg in the coconut mixture and form into an egg shape.
- Roll or sprinkle with sprinkles.
- Cool completely.
- Wrap in plastic wrap or store in an air-tight container.
Note: If you’d like to make more than four, make them in batches rather than doubling or tripling the recipe.
Chocolate Easter Egg Baskets

Ingredients:
- 6 ounces good-quality dark chocolate, broken or chopped into small pieces (about 1 cup)
- 4-1/2 cups Ricke Krispies
- 72 mini chocolate eggs (I used Cadbury mini eggs)
Instructions:
- Place the chocolate in a microwave safe container. Heat at 50% power for 1 minute Remove and stir well.
- If chocolate is not melted, return it to the microwave and continue heating, stopping to stir it every 10 to 20 seconds to avoid scorching.
- When only small lumps remain, remove and continue to stir until the chocolate is completely melted.
- Add the Rice Krispies and stir to coat well with the chocolate.
- Divide the mixture evenly among 24 paper baking muffin cups.
- Flatten each “nest” a little to make a well in the center.
- Fill each cup with 3 Cadbury mini eggs.
- Let them set until firm.
Thanks! spaceshipsandlaserbeams, simplybeingmommy, babble, coconutandlime, simple-nourished-living


 4. Immediately pour into the teacup and fill to the top. You will want to leave 1/4″ – 1/8″ at the top. Make sure you don’t get any on the wick!