Category: DIY

Simple DIY Tulle Tutu!

tulletutu

These DIY tutus are so cute! They are good for all ages from babies to young girls.  They can be used for dress up, a cute outfit for photos, birthdays, or color coordinated for a holiday outfit.  You can find the supplies at at craft store and the tutu can be made in an afternoon or less.  Scroll down for the instructions!


Supplies:

  • Tulle (either on spools, or by the yard) in your desired color
  • 7/8″ ribbon in your desired color
  • Scissors (or rotary cutter and mat)
  • Measuring tape

Instructions:

  1. Measure the child’s waist, as well as from the waist down to the point where you’d like your tutu to fall.   The measurement of your child’s waist is the measurement for the ribbon. And the measurement for how long you want the tutu is needed for the length of the tulle.
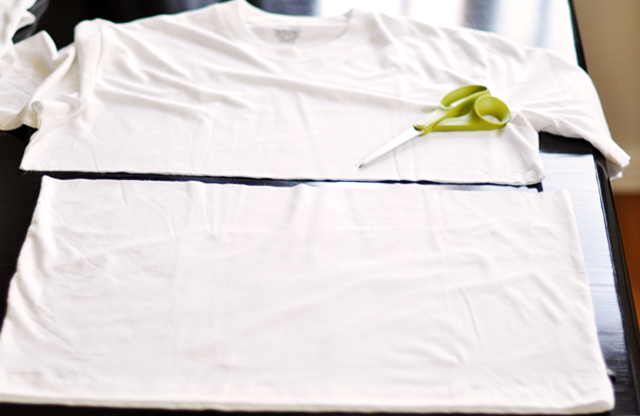
  2. Cut your strips of tulle. (tulle on spool is recommended) (If you buy tulle by the yard cut it all into six-inch wide strips before cutting the strips to the needed length). You can use a little or a lot of tulle, it’s up to you. To make fluffy and full tutus, use about 75 yards of the tulle on spools.
  3. To cut the length of the tulle measure twice the length you previously measured. (IE: if you previously measured 12 inches down, your strips will be 24 inches long) Cut the tulle into strips and set aside.
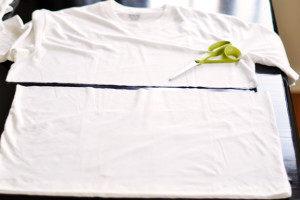
  4. Cut your ribbon. Add 48 inches to your waist measurement and cut the ribbon this length. This will ensure nice, long ends to tie a pretty bow with. Heat seal the ribbon ends with a lighter so they don’t fray, but if you don’t mind a little fraying you can skip this step.
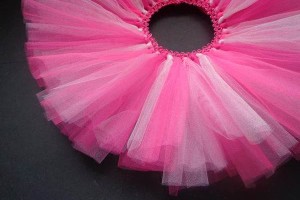
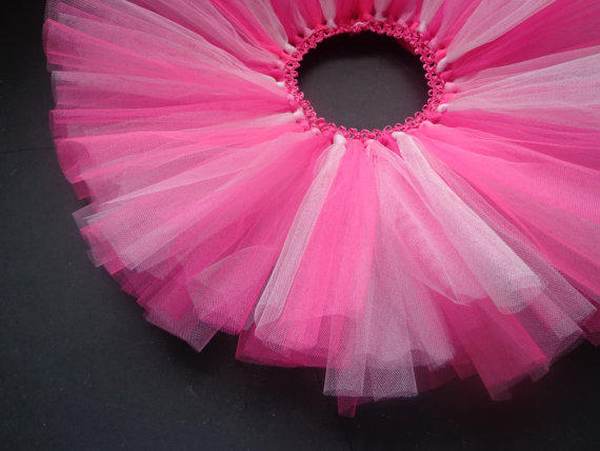
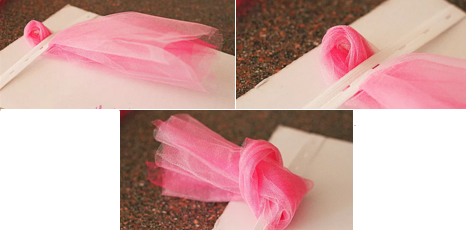
  5. Start knotting on your tulle. To make super fluffy tutus, use three strips of tulle for each knot. Gather your three strips together, fold in half and slip the folded part underneath the ribbon. Grab the two long sides of the tulle and bring them up through the fold, pull tight, and slide all the way toward the left of your ribbon.  Continue until you have reached the desired amount of tulle for your tutu.
  6. Leave about 10 inches of loose ribbon on each side of the tied tulle to tie a good size bow on your little princess.
  7. tutu
  8. You’re done! You can trim up the bottom if you’d like, but I like the not-so-perfect look of it when it’s finished so I don’t do any trimming.

Thanks, simplyrealmoms for the step by step instructions!

Pistachio and Chocolate Leprechaun Cookies Recipe! These Sound Amazing!

cookies

Pistachio and Chocolate Leprechaun Cookies Recipe! These Sound Amazing!

Saint Patricks Day is next Thursday, so our family has been planning some fun recipes for the day! So, I’ve been looking up recipes and these Pistachio and Chocolate Leprechaun Cookies look amazing! My husband is a big pistachio fan and I’ve never used them in cookies! Here’s what you’ll need:

  • 1 cup butter, softened
  • 1/2 cup granulated sugar
  • 1/2 cup light brown sugar
  • 1 teaspoon vanilla extract
  • 1/2 teaspoon almond extract
  • 1 (3.4 ounce) package instant pistachio pudding (dry mix)
  • 2 eggs
  • 2 1/4 cups cups all-purpose flour
  • 1 teaspoon baking soda
  • 1/4 teaspoon salt
  • 1/2 cup dark chocolate chips
  • 1/2 cup green M&Ms
  • 1/2 cup chopped walnuts
  • green food coloring *optional

How did your recipe turn out? Let us know, we love to hear from our readers! For additional directions on how to make this sweet treat, visit the I Heart Naptime Webpage!

DIY Geometric Canvas Painting

This is a simple and creative way to DIY canvas art for your house.  The directions that follow are fool proof, straight forward, and will hopefully guide you to successful art.  If you do this, take a picture and send it to me via Facebook message.  I always enjoy your feedback and hearing from my followers!

canvas canvas4 canvas3 canvas2

Supplies:

  • A pre-stretched canvas
  • Masking Tape
  • Assorted small acrylic paint colors
  • Brushes

Instructions:

  1. Paint 2 coats of a base coat on your canvas. Be sure to paint the edges.  Next up,
  2. After base coats are dry start taping. Use masking tape.
  3. Drape the tape back and forth, cross the canvas. Anything you like. Make angles to get lots of interesting shapes.  If you choose to do only vertical & horizontal, you’d get a nice clean square & rectangle effect too.
  4. Make sure to really rub the tape onto the canvas.
  5. Paint the same base color over the tape.  This prevents any potential leaks in your tape job will be the same color as the base.  Let dry for about an hour.
  6. Start to fill in the geometric shapes with the other colors of acrylic paint you have selected.
  7. Paint two coats of each color, allowing dry time in between.
  8. Once it’s completely dry, start gently pulling your tape.
  9. When you pull tape, you want to pull completely backwards, parallel to the canvas so it really tears any spots where they paint may have wanted to stick.

To get great color combination ideas google “color palette ideas” and it will help you think outside of the box!

DIY Wine Cork Mat

winecork

DIY Wine Cork Mat

This mat can be used both in the bathroom and entry room. Cork absorbs water so it is great for both of these rooms. You can make use of all the corks from your wine bottles and ask your friends to save theirs too.

  1. Gather the corks. If you’ve been collecting corks, check that you’ve got enough, as you’ll need around 150 to 200. If not, additional corks can be purchased from brewing or wine-making suppliers, craft stores or through online retailers. Also check your local thrift store as sometimes they get people’s collections of old corks. If using used corks, check that they’re clean. They should be free of dust, wax or any build-up. Warm soapy water is best for cleaning them––just ensure they’re thoroughly dry before beginning the craft project.
    • For wine-stained corks, simply soak them overnight in a bowl of water to which you’ve added a touch of bleach. This should remove the wine. Rinse clean, and allow to dry thoroughly before using.
  2. Slice each cork in half, lengthwise. Be especially careful not to slice your fingers when doing this. It helps to wear work gloves during this part of the process and lay down a non-slip surface for the cutting board to sit on, such as a silicon map, before beginning. Take plenty of breaks, as there are a lot of corks to get through––grab a friend to help if possible. To slice the corks in half:
    • Stand the cork up on the cutting board or cardboard, then cut downward. Hold the top of the cork with your finger and slice it neatly in half.
    • Sand the sides of the cork if they become too jagged. Gently run the sandpaper down the sides and along the middle to ensure a smooth, clean surface.
  3. Create the bathmat base. Use a plastic shelf liner or shower mat to serve as the base––a previously designed rubber shower mat may be the best option, as it will provide structure. However, your mat will be more flexible if you choose to use a plastic shelf liner. A more solid alternative can be to use a piece of water-resistant wood, like marine-ply (or wrap the wood in plastic or oil it––the latter option may make gluing hard though).
    • Determine the size by either using another shower mat as the guide or measuring the custom size you desire. Consider your bathroom dimensions when determining size.
    • Cut the liner using either the box cutter or the sharp knife. If you need to size the base, use a ruler or straight edge to mark areas to cut.
    • Lay the shower mat or cut shelf liner down flat on the floor or on another flat surface. Cut the liner or mat either on a work table or on an outside patio so you don’t slash your floor or any furniture. Placing a self-healing cutting mat underneath can be helpful.
  4. Arrange the cork halves around the perimeter of the line or mat. Begin by creating a border with cork halves lining up vertically along the edges of the mat:
    • Line the corks up so the bottom of each cork (end) butts up to the sides of the mat or liner.
    • Complete the entire perimeter of the mat with corks until the entire mat/liner has been lined with corks. If you don’t achieve a perfect fit, cut some of the corks to fit.
    • Apply hot glue to the flat half of each cork and press the cork into the liner or mat. Use a dab of glue at the top and bottom of each cork and press firmly into the mat. Use a rag to wipe any excess glue that may ooze out from beneath the corks.
  5. Add the remaining corks to the mat. Create a pattern or design with the cork layout, working your way from the outside inward with the remaining cork halves. Continue either with the vertical pattern or consider laying corks in a horizontal fashion and then alternating for each surrounding row.
    • It’s probably a good idea to lay out the cork halves first to determine a pattern and then glue the corks to the mat after you’re sure they will all fit. That way, you won’t start your mat and then get stuck if your pattern doesn’t work out or if you don’t like they way it looks.
    • Trim corks if needed to accommodate the size of the mat/liner. Keep your knife/scissors handy in case you need to customize cork size.
  6. Allow to dry completely before using. It might be a good idea to apply a coat of protective sealant such as polyurethane or cork sealant across the top of the cork bathmat, to waterproof it. However, corks can withstand small brushes with liquid (after all, they are in wine bottles a lot of the time), provided they’re not constantly soaked. You might find the mat lasts okay if you don’t end up with a floor awash with water each use and if you drop a small hand towel over the top of it before stepping on it from the shower. On the other hand, as with all bathroom items, there is a risk of mildew growth over time. This can possibly be avoided by placing the mat up somewhere that allows air circulation to dry it, and leaving it in the sun once a month or so, to ensure it dries out well. Whether or not you add a sealant is really a personal choice, and you might like to ask your local eco-hardware supplier if there are some eco-friendly choices for sealants available.

5 Easy Breakfasts for Busy Mornings!

breakfast

5 Easy Breakfasts for Busy Mornings! Everyone is always looking for ways to gain a little extra time in our day without skimping on meals. I decided to share with you 5 Easy Breakfasts for Busy Mornings. As we all hear it is the most important meal of the day so lets make it easier.

1. Peanut Butter Banana Smoothie
Smoothies are a perfect quick and easy breakfast to make with ease. Blend 1 frozen banana, 2 tablespoons peanut butter, 1 cup almond milk, and several ice cubes. Tip: Add a scoop of your favorite chocolate or vanilla protein for an extra protein boost. To make this easy on the go just pour the smoothie into a twist cup with a straw to enjoy your breakfast while on the move.

2. Slow Cooker Maple-Berry Oatmeal
Steel-cut oats take a long time to break down; this recipe makes it easy by simmering them overnight in a slow cooker. Plus you get to amp up flavor with dried cranberries and blueberries (or you other favorite fruit) and maple syrup.
8 c. water, 2 c. steel-cut oats, ½ c. dried blueberries, ½ tsp. salt, 1 c. Dried Cranberries, ¼ c. maple syrup
This easy recipe cooks over night, so the night before combine the water, oats, blueberries & salt in a slow cooker. Cover and let it cook on low 7 to 8 hours or until oats are tender and creamy to your liking. Before eating stir in the cranberries and syrup.

3. Fruit and Yogurt Parfait
One of the easiest, healthiest, and tastiest breakfasts you can have in a pinch to keep you enjoying breakfast on the go. All you need is some yogurt and your favorite fruits. Try choosing fruits that are in season for the most flavorful budget friendly options.

4.Leftovers and Egg
Trying to figure out what to do with last night’s leftovers? Take those leftovers of veggies, potatoes, or meat in a tupperware or glass container. Then pull an egg out of the fridge and crack the egg on top, then heat in the microwave until the egg white is cooked through, 30 to 45 seconds. Then enjoy your yummy breakfast.

5. Eggo Waffle PBJ-Wich
Don’t miss your change for an Eggo which on the Go! Prepare 1 whole-grain toaster Eggo waffle and slice in half. Spread with 2 tablespoons peanut butter. Then layer in 2-3 sliced strawberries (or your favorite fruit of choosing like blueberries or banana.) on top in place of the traditional jelly if you like.

DIY Ideas: Repurpose Old T-Shirts for Spring & Summer.

shirt DIY

DIY Ideas: Repurpose Old T-Shirts for Spring & Summer. Start by going thru your shirts that are maybe old and warn or maybe even stained to repurpose. If you dont have any T-shirts you are looking to repurpose you could always go to the thrift store or a garage sale and pickup some gently used T-Shirts for cheap. Then you will be on your way to repurposing those T-Shirts.

A Few things that you can repurpose those old T-shirts into.
1. Head Band
2. No Sewing – Hand Bag
3. Dip Dye T-shirt
4. Easy DIY Scarf

For the Full Details watch the video above.

Make an Earphone Holder! So Genius!

diy

Make an Earphone Holder! So Genius!

Do you listen to music with your earphones on a daily basis? If so, we have a genius DIY to show you! You can make an earphone holder with an old mint container. Isn’t that great? I am going to make this DIY project pronto, because it can clip on your purse or gym bag. You’ll need:

  • Fabric or Scrapbook Paper
  • Mod Podge
  • Key Chain Link & Fastener
  • Goo Gone Spray (to remove any sticker residue)
  • Drill
  • Cup/Lid/Bowl (to cut fabric circle)
  • Scissors
  • Empty Mint Container

Let us know how your project turned out and what you thought! I am super excited for this project! For additional directions, be sure to visit the Make It Love It Webpage.