Category: DIY

Recipes: 7 Ways to Eat Waffles for Dinner!

melt

Recipes: 7 Ways to Eat Waffles for Dinner!

Waffles are awesome for breakfast, but what about dinner or lunch? In our family, we love to experiment with these waffles and make delicious and unique dishes. If you’re like me and absolutely love waffles, then be sure to check out these recipes below:

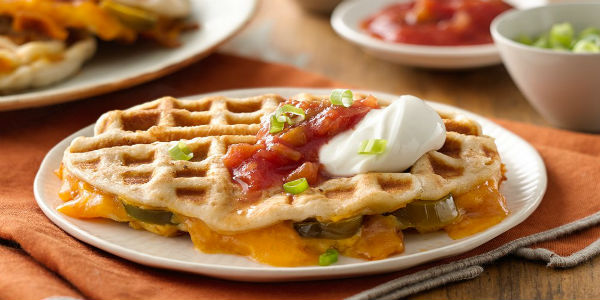
Jalapeño Cheddar Waffle Melts:

  • 1 can Pillsbury™ Grands!™ Jr. Golden Layers™ refrigerated buttermilk biscuits (10 biscuits)
  • 1 teaspoon Watkins™ Chili Powder
  • 1 cup shredded Cheddar cheese (4 oz)
  • 1/2 cup pickled sliced jalapeño chiles, drained
  • 1/2 cup chunky-style salsa
  • 1/2 cup sour cream
  • 4 medium green onions with tops, chopped (1/4 cup)

Pizza Waffles:

  • 1 can (16.3 oz) Pillsbury™ Grands!™ Flaky Layers refrigerated biscuits
  • 8 slices (1 oz each) mozzarella cheese
  • 1/3 cup mini pepperoni slices
  • 2 cups Muir Glen™ organic pizza sauce

Buffalo Chicken Waffles:

  • 1 can (16.3 oz) Pillsbury™ Grands!™ Flaky Layers original refrigerated biscuits
  • 1/2 cup packed brown sugar
  • 1/2 cup hot sauce
  • 1 lb boneless skinless chicken, cooked, shredded
  • 1 cup shredded mozzarella cheese (4 oz)
  • 1 cup ranch dressing
  • 1/2 cup chopped green onions (4 medium)

PB & J Waffle Sandwiches:

  • 1 can (16.3 oz) Pillsbury™ Grands!™ Flaky Layers refrigerated original biscuits
  • 1/2 cup peanut butter
  • 1/4 cup grape jelly
  • 1 tablespoon powdered sugar
  • 1 cup fresh fruit (such as strawberries, peach slices, grapes)

Waffle Bacon Cheeseburgers:

  • 2 lb lean (at least 80%) ground beef
  • 1 can (16.3 oz) Pillsbury™ Grands!™ Flaky Layers refrigerated biscuits
  • 8 slices (1 oz each) Cheddar cheese
  • 8 slices bacon, crisply cooked, halved

Tex-Mex Waffle Tacos:

  • 1 can (16.3 oz) Pillsbury Grands! flaky layers refrigerated original biscuits
  • 4 cups purchased chili, heated
  • 2 cups shredded iceberg lettuce
  • 2 cups shredded Cheddar cheese (8 oz)
  • 1 container (8 oz) sour cream
  • 1 jar (16 oz) Old El Paso™ Thick ‘n Chunky salsa

Grands!® Jr. Honey Ham Waffle Sandwiches:

  • 1 can (12 oz) Pillsbury™ Grands!™ Jr. Golden Layers® refrigerated honey butter biscuits
  • 10 slices (2/3 oz each) Muenster cheese
  • 5 oz very thinly sliced cooked ham (from deli)
  • 2 1/2 teaspoons sweet honey mustard

What are your favorite recipes involving waffles? Out of these options, my family really enjoys the waffle sandwiches. Find these recipes and more here!

DIY | COPPER PIPE PINEAPPLE MIRROR

This is SO cute!

DIY | COPPER PIPE PINEAPPLE MIRROR

Mirror

Supplies:
-pine oval plaque-9″ x 12″ x .63″
-oval glass mirror w/scalloped edge 8″ x 10″
-3/8″ x 2′ type L, hard length copper pipe
-pipe cutter
-super glue
-copper metallic paint
-foam brush
-pen
-power drill
-3/16″ drill bit
-5/16″ drill bit
-3/8″ drill bit
-sawtooth picture hanger
-hammer

Thanks to A Beautiful Mess for teaching us this trick!

Lemon Sugar Scrub DIY!

scrub

Lemon Sugar Scrub DIY!

Sugar scrubs can be so pricey at your local stores! So, why not make your own at home? It’s simple, inexpensive, and only takes 5 mintues! My family tried this recipe below, this weekend and loved it! Ingredients:

  • ¼ c. Coconut Oil (melted)
  • ¾ – 1 c. granulated white sugar
  • 2-4 drops yellow or red food coloring depending on which batch you make
  • 10-15 drops Lemon Essential Oil or 10-15 drops Raspberry or Vanilla Extract

This Lemon Sugar Scrub will make a great gift and a treat to yourself or others! Let us know how yours turned out, we love to hear from our readers. For additional directions on how to make this scrub, visit the Reason To Skip The Housework Webpage!

Easy DIY Pom Pom Garland

I think this is the CUTEST look! You can use this to decorate for any holiday, birthday, or bedroom.  This DIY pom pom garland is such a great look year round. I have found a easy tutorial to help you get started.


pompom

pom3


Supplies:

  • Wool or Yarn in various colors. We used pink, dark pink and white.
  • Wool to string your pom-poms onto – you might like to use twine or embroidery thread
  • Sharp scissors
  • Fork
  • Darning needle

First thing to do is to make your pompoms. I enlisted my daughters help and we both got busy and made a bunch of pom-poms. Unfortunately I ended up making all the pompoms on my own as my little helper would only make them if they were in her favourite color blue, she wouldn’t go anywhere near the pink.

Making pompoms is pretty easy as you can see from our little ‘how to make a pom-pom’ guide below.

Instructions to making a basic mini pom-pom:

  1. Basically, you take your yarn and wind it around the tines of your fork. About 50 to 90 times depending on the thickness of your wool.
  2. Cut a length of yarn about 10cm long.
  3. Tie the length of yarn tightly around the center. (I like to tie it once as tight as I can, but before I knot the length I slip the pompom off the fork and then pull the length tighter again. Then I complete the knot)
  4. Take your sharp scissors and cut through the loops.
  5. Now you need to tidy up your pompom with your scissors. You will take off quite a bit of wool so don’t worry too much if it feels like you’re trimming more than you should.
  6. Stop trimming when you have a nice round shaped ball.

Assemble your Pom-pom Garland

When you have made at least a dozen pom-poms, use a needle and thread to thread them onto a length of yarn spacing them evenly. For these sized pompoms I like to leave a gap of around 12cm between each one. Ensure that you leave approx 30cm of yarn at each end for hanging.

These garlands are really versatile and you can use them to brighten up any room. After the party you can reuse it to dress your window, mantle, walls. A Christmas themed garland would look fantastic on your Christmas tree.

thanks, Jellyfishprints!

Washi Tape Mini Wood Pallet DIY Coasters!

Washi-Tape-Mini-Pallet-craft

Washi Tape Mini Wood Pallet DIY Coasters!

My husband and I love to collect different nerdy mugs and glasses. Every time we visit somewhere, we buy a mug from that state or country. So, my husband and I searched for a inexpensive coaster DIY idea and found one! Your guests will absolutely love these and ask how you made them! Here’s what you’ll need to make your own:

  • wood craft sticks
  • 1/2″ square balsa wood rod (look in the wood section at your hobby store)
  • pliers with wire cutting blade
  • craft knife
  • sand paper
  • hot glue gun
  • washi tape
  • scissors
  • Mod Podge

Let us know what you thought of this DIY and how yours turned out! This is such a cute craft idea, so do not miss out.  For additional directions on how to make this coaster, visit the Washi Tape Crafts Webpage!

Pineapple Facial Scrub DIY!

item

Pineapple Facial Scrub DIY!

Do you have large pores on your face? I know that I do! Buying cremes and medicines can be pricey, especially if they are prescription. I am allergic to many of the chemicals in these cremes both prescription and over the counter. So, I tried this DIY and it totally worked! Plus, there are only three inexpensive ingredients! Ingredients:

  • 1/2 Cup of Crushed Pineapple
  • 1/2 Cub Cornmeal
  • 2 Tbsp Jojoba Oil

Let us know what you thought of this Homemade Pore Minimizer and how it worked! For additional directions on how to make this homemade remedy, visit the EHow Webpage!