Category: DIY

Get Your Crafting On With This Fun DIY!

keys
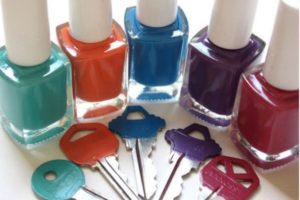
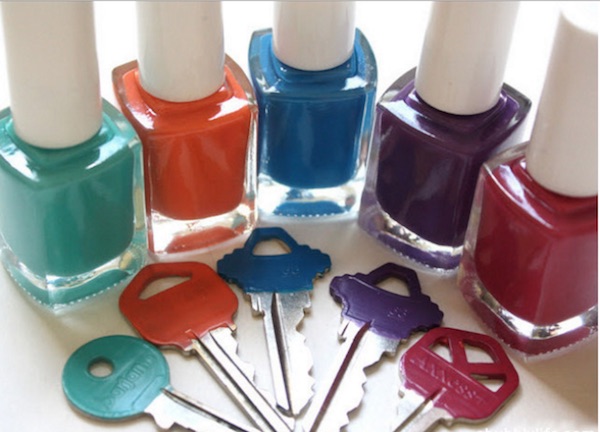
Here is a great way to spice up your boring keys! Ok I will have to admit, I am a little obsessed with this! You can get just about as creative as you want! This is super simple and your kids would have a blast helping you make these! Mine did!

Materials:
*nail polish in any color your want!!
*clear nail polish
*metal keys (this does NOT work with plastic covered keys)

Directions:
1. Wipe down your keys and make sure they are completely dry!
2. Pick a nail polish color and start painting your keys! Please ONLY paint the top part! You don’t want flecks of paint in your key holes!
3. Let dry completely, flip, and do the other side!
4. Once the whole key is dry, then you will want to paint a clear coat over the front and back of the painted area!
5. If you want to get creative then do that BEFORE you paint the clear coat!
6. Add to your key ring and you are good to go!

Wasn’t that just the cutest idea ever? I want to see what you did! Did you like this one? Let us know in the comments below! In the meantime, check out our other DIY’s over on our page!

Italian Tortellini Salad Recipe!

salad

Italian Tortellini Salad Recipe!

Need to make a dish for your next barbecue or special event? If so, you must try this Italian Tortellini Salad recipe! This salad is both delicious and easy to make, wohoo. Even my kids love this tortellini salad recipe, which is great for our family. Are you wanting to make this tortellini dish as well? If so, here are the ingredients you’ll need to purchase or pick up:

Salad:

  • 1 lb 4 oz three cheese tortellini
  • 10 oz cherry tomatoes, cut in half
  • ⅔ cup banana peppers, chopped
  • ¼ lb capicola ham, chopped
  • ¼ lb pepperoni, chopped
  • ⅓ lb hard salami, chipped
  • 8 oz fresh mozzarella cheese, chopped
  • 2 Tbsp minced Italian parsley
  • 6-8 basil leaves, minced
  • Salt

Dressing:

  • ½ cup virgin olive oil
  • 2 Tbsp white balsamic vinegar (white wine vinegar can be substituted)
  • 1 Tbsp fresh lemon juice
  • 3 garlic cloves, pressed
  • Salt
  • ¼ (or ½ is desired) tsp crushed red pepper flakes
  • 2 tsp dry herb de provence

For additional directions on making this recipe, be sure to visit the Italian Tortellini Salad Recipe! Have you tried a similar recipe before? If so, what did you think? Be sure to let us know in the comment section below.

Paper Plate Snake Project!

32

Paper Plate Snake Project!

Looking for a craft to make with your children this Saturday or holiday weekend? If so, I found this Paper Plate Snake project, which looks very fun and inexpensive to make. I love saving money and this is a great option for our home. Plus, I was able to pick up googly eyes, ribbon, and bubble wrap for less than $5! Want to make this paper plate snake craft as well? If so, be sure to pick up the following supplies:

  • Paper Plates
  • Green Paint
  • Roller
  • Bubble Wrap
  • 2 Googly Eyes
  • Red Ribbon
  • Glue

snake

For further instructions on making this project, be sure to visit the Craft Morning Webpage. What crafts have you made this summer? Let us know, because we love to hear from our readers.

Strawberry Oatmeal Bars Recipe!

bars

Strawberry Oatmeal Bars Recipe!

Want to make something different for breakfast morning this weekend? If so, then you must try these Strawberry Oatmeal Bars. I just recently made these for my family and they did not last long. They taste like heaven! Plan on making these oatmeal bars too? If so, here are the ingredients you’ll need to pick up:

  • 1 cup old fashioned rolled oats
  • ¾ cup all purpose flour
  • ⅓ cup light brown sugar
  • ¼ teaspoon ground ginger
  • ¼ teaspoon kosher salt
  • 6 tablespoons unsalted butter, melted
  • 1 teaspoon cornstarch
  • 1 tablespoon freshly squeezed lemon juice (from about ½ small lemon)
  • 1 tablespoon granulated sugar, divided
  • 2 cups, small-diced strawberries (10 ounces)
Vanilla Glaze
  • ½ cup powdered sugar, sifted
  • ½ teaspoon pure vanilla extract
  • 1 tablespoon milk (any kind you like)

materials

For further instructions on making this craft, be sure to visit the DIY Candy Webpage. Let us know what you thought of this recipe in the comment section below. We love to hear from our readers.

Bath Tub Science Fun – Floating Cupcakes DIY!

science

Bath Tub Science Fun – Floating Cupcakes DIY!

Want a tutorial for floating cupcakes that your kids will love? If so, you must this fun project with your kiddos. I tried this fun tutorial with my youngest niece and she had such a great time. Want to make this craft as well? If so, be sure to pick up the following supplies in-store:

  • Cupcake liners – aluminum foil or silicon work great.  You could also use small plastic storage containers.
  • Sponge(s)
  • Scissors
  • Mr. Bubble Original Foam Soap for “frosting”

cakes

For additional directions on how to make these floating cupcakes, click here and visit the Kid’s Activities Blog! What crafts have you made with your family lately? Let us know in the comment section below, because we love to hear from our readers.

Jalapeño Popper Grilled Corn Salad Recipe!

corn1

Jalapeño Popper Grilled Corn Salad Recipe!

Looking for a fresh and delicious recipe during these summer months! If so, why not try this Jalapeño Popper Grilled Corn Salad Recipe? I have not yet tried this dish myself, but I love fresh corn, especially jalapenos. Plus, corn is so inexpensive right now! If you’d like to make this salad, be sure to pick up the following items:

  • 8 Ears of Corn (olive oil, salt, pepper
  • 2 Jalapeños – seeds & stems removed, finely chopped
  • 1 Cup Chopped Cooked Bacon
  • 2 ounces Cream Cheese – softened
  • 1/4 Cup Sour Cream
  • 1 Cup Grated Cheddar Cheese
  • Salt/Pepper To Taste

corn2

Have you tried a recipe similar to this before? If so, let us know what you thought in the comment section below. For further instruction on making this summer treat, be sure to visit Wonky Wonderful Webpage! 

Simple Wind Chime Craft!

cup1

Simple Wind Chime Craft!

Want to make a craft this weekend with your kiddos? If so, why not make an outdoor project that they’ll see all summer? Check out this Toddler Wind Chime Craft, pictured above. This project looks fun and inexpensive to make, which is great for my family. If you’d like to make these wind chimes too, then here are the materials you’ll need:

  • Plastic Cup
  • Thread/String
  • Beads of different shapes and sizes
  • Small Jingle Bells
  • Scissors
  • Small clump of play dough

PS: I was able to find most of these materials at my local Dollar Tree store, which helped me save money.

cup2

For additional directions on making these wind chimes, be sure to visit the Rainy Day Mum Webpage for more details. What DIY projects have you made with your kids lately? Let us know, because we love to hear from our readers.