Tag: DIY

Vicks Vapor Rub Shower Disks DIY! Great For Helping With The Flu!

disk

Vicks Vapor Rub Shower Disks DIY! Great For Helping With The Flu!

I am pleased to announce that I’ve done this DIY project and it is amazing! Make these Vicks Vapor Rub Shower Disks and save them when you or your family have a sickness like the flu. From experience, I love using these shower disks when I have body aches from working out as well! You’ll need:
Baking Soda, cornstarch, Vicks (Can use baby Vicks for a more gentle smell), water, and Mold tray (ice cube, chocolate).

How did you think of this DIY project and how did yours turn out? Let us know, we love to hear from our readers! For additional directions on how to make these shower disks, visit the Our Kids Mom Webpage!

DIY Pallet Coffee Rack!

DIY Pallet Coffee Rack!

The wood pallet has revolutionized decorating recently.  Here is just one of the many ideas that you can find swarming around the internet and decorating homes.  This is a coffee mug rack that is super simple to make.  Scroll down for more instructions.  If you make this I’d love to see a picture!

coffee

Materials and Equipment:

  • Pallet
  • Hooks and screws
  • Paint, letter stencils, sponge brush (Optional
  • Sandpaper
  • Right angle ruler
  • Ruler or tape measure
  • Pencil
  • Safety glasses
  • Circular Saw
  • Cordless Drill
  • Screwdriver
  1. This is a fourth of the pallet, so first decide which fourth has the best-looking wood.
  2. Mark where you want to cut using a pencil and right angle ruler.
  3. Next cut along your pencil markings using a circular saw. ****Make sure to wear safety goggles**
  4. First, a couple of notes:

    (1) You may want to power wash your pallet before you dive into this project since you’ll be hanging things that you drink out of on it!

    (2) I added the COFFEE detail on the top, but this is obviously optional! The top board was longer, so I decided to add some words instead of hooks.

  5. Once you have your mini pallet, sand it down! How much you sand is up to you, but make sure it is smooth enough that you won’t get splinters when you hang up your coffee cups.
  6. Next I painted COFFEE on the top. I used letter stencils and a sponge brush. I’m really happy with how it turned out! (Sorry I didn’t get a picture while I was doing it!)
  7. Putting on the hooks was probably the most difficult part. Use a ruler (or tape measure) and pencil to mark exactly where you want the hooks to go, then drill them in. My hooks weren’t totallyeven, but once we hung the coffee cups you could hardly notice!
  8. Lowes sells these hooks for $1.50 each.

Here are a few additional facts and tips:

  1. The final “mini pallet” is 20.75″ x 25″. The top board is 5.5″ and the other 3 are 3.5″ tall. The stencil letters I used are 3″ tall.
  2. Here are a couple of pictures of how we hung it up. As I mentioned in the comments, we kept one of boards on the back of the pallet and rested that on two nails in the wall.

If you are wanting more wood pallet crafts click here to find 23 Awesome DIY Wood Pallet Ideas !!

Thank you, littlebirdblog!


Cookies And Cream Popcorn Recipe!

popcorn

Cookies And Cream Popcorn Recipe!

Love popcorn and want something sweet today? If, so make this delicious Cookies And Cream Popcorn Recipe! I’ve made this exact recipe with my family and they’ve loved it, so do not miss out. I know that I’ll be making it again, because it is so easy and inexpensive. Ingredients:

  • 9 cups popped popcorn
  • 20 Oreos, finely crushed
  • 24 oz. White Vanilla Almond Bar

Let us know what you thought of this recipe, we love to hear from our readers. For additional directions on how to make this tasty treat, click here!

5 Drool Worthy Pizza Hacks!!

In my home pizza is ALWAYS a crowd pleaser, no matter the time of day or the form it comes in. Here are 5 pizza hacks that are pretty easy to make and will shake things up in the pizza department.  All of these are a must-try in my opinion. Scroll down and get ready to drool, these all look simply delicious.

pizza1

Pizza Croissant Rolls

Ingredients

  • 1 (8 ounce) package refrigerated crescent roll dough
  • 4 cheese sticks, halved
  • 1 (3.5 ounce) package sliced pepperoni
  • optional – marinara or ranch sauce for dipping

Garlic Butter Glaze:

  • 2 tablespoons butter, melted
  • ½ teaspoon Italian seasonings
  • ¼ teaspoon garlic powder
  • 1 Tablespoon grated Parmesan cheese
  • Try an Easy One Pan Italian Pasta Recipe.

Instructions

  1. Preheat oven to 350 degrees.
  2. Take each triangle of crencent roll dough and place about 6 pepperoni on the bottom of the triangle.
  3. Place half of a cheese stick on top and roll up. Place seam side down on a cookie sheet and bake for 10
  4. 14 minutes or until golden brown.
  5. While rolls are cooking, combine the melted butter, Italian seasonings, garlic powder and Parmesan cheese in a small bowl.
  6. When rolls are done remove from the oven and brush with the garlic butter glaze. Serve with marinara or ranch for dipping.

pizza2

Stuffed Pizza Waffles

Ingredients

  • 1 recipe pizza dough
  • 8 ounces mozzarella cheese, sliced
  • Sliced pepperoni, cut into quarters
  • Marinara sauce for dipping
  • Instructions

Instructions

  1. Preheat your waffle iron.
  2. Roll out the pizza dough on a lightly floured surface and cut into equal sized squares, about 3″ x 3″ but it doesn’t have to be exact.
  3. Lay the sliced mozzarella in the center of the dough, being generous with the cheese because some will leak out.
  4. Add the pepperoni, then top with another square of pizza dough.
  5. Place on the waffle iron and close the lid, pressing down firmly but do not lock the lid. The lid will raise slightly while the dough cooks, but that is fine.
  6. Cook for about 5 minutes, or until the dough is golden brown.
  7. Serve with marinara sauce for dipping.

pizza3

Poor Mans Pizza

Ingredients:

  • Slices of bread or flour tortillas (or both)
  • Pasta sauce
  • Pepperoni
  • Red onion, chopped
  • Bell pepper, chopped
  • Dashes of Italian seasoning, Onion powder, Garlic powder
  • Parmesan Cheese
  • Shredded cheese (mozzarella or cheddar)

Instructions:

  1. Place your tortillas or slices of bread on baking sheet.
  2. Spread with pasta sauce.  Add pepperoni, vegetables, herbs and spices.
  3. Sprinkle with cheeses.
  4. Bake at 400 degrees for 4-5 minutes until cheese is melted.
  5. Pure deliciousness!

pizza4

Pizza Fries

Ingredients

  • 1 1/2 Cup frozen fries, baked or deep-fried
  • 2 Tablespoons diced pepperoni
  • 1/4 Cup marinara sauce
  • Pepperoni slices, for garnish
  • 1/2 Cup shredded mozzarella cheese, or more if needed

Instructions

  1. Preheat the oven to broil.
  2. In a small bowl, toss the fries with the diced pepperoni.
  3. Add the fry-pepperoni mixture to a fry boat or shallow bowl.
  4. Top with the marinara sauce, a few slices of pepperoni, and the mozzarella cheese.
  5. Broil in the oven until the cheese is melted and bubbly, about 1 minute.

pizza5


Pizza Eggrolls

  • Eggroll wrappers
  • Pepperoni slices
  • Mozzarella st
  • ring cheese
  • Dried oregano
  • Peanut oil for frying
  • Pizza sauce for serving


  1. Orient the wrapper with the points facing you, as a diamond shape.  Not like a square. Lay several pepperoni slices out in the middle of the egg roll wrapper, overlapping them a little.  Unwrap and lay the mozzarella string cheese out on top of the pepperoni.
  2. Season generously with dried oregano.
  3. Wet the edges of the wrapper.  Fold in the side points closest to the cheese.
  4. Wet the folded sides with your finger, then fold up the point closest to you over the cheese.
  5. Make sure the far point of the wrapper is wet , then roll the whole thing away from you, sealing the wrapper.
  6. Allow the rolls to “dry” on parchment while you are prepping the rest of the rolls.
  7. Fry in peanut or canola oil for about 2 minutes each.  I had my oil at about 375 degrees F.  If your rolls do not immediately start sizzling, your oil is not hot enough.
  8. Drain on paper towels and serve with warm pizza sauce.

Thanks, the-girl-who-ate-everythingmykitchenescapadesmyblessedlifethedailymealmenumusings!


Make These Adorable Teacup Candles

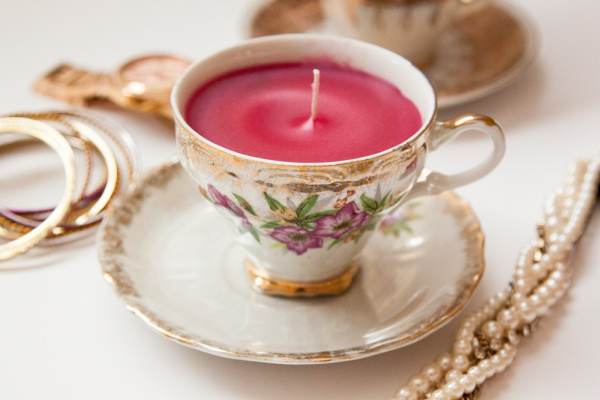
Don’t you love the vintage look of these tea cup candles?  The good news is that you can make them yourself!! Consider giving these as a gift, decorating your home, or decorating a wedding shower.  They are easy to make and pretty to look at.   Scroll down for the easy DIY instructions!!

teacupcandle

DIY Teacup Candles

Supplies:

  • Vintage teacups
  • Colored Granulated Wax (or soy wax flakes)
  • Candle Wicks
  • Skewers
  • Optional: Candle scent

Directions:

1. Make sure the teacups are totally clean!

2. Set one wick in the center of the teacup. Keep steady by pinching the wick in place with the skewers. You can use tape to keep the skewers together to keep them from moving, but it isn’t necessary.

3. Using a double boiler, melt the wax until liquid. If you are using any special candle scents, pour in a few drops right before moving on to the next step.

DIY Teacup Candles4. Immediately pour into the teacup and fill to the top. You will want to leave 1/4″ – 1/8″ at the top. Make sure you don’t get any on the wick!

5. Wait for the candles to solidify. This will take a few hours.

6. Trim the wick at the top to about 1/4″.

Alternative Directions:

If you are using granulated wax, you don’t need to do any melting! This is a great option if you’ve never made candles before or don’t feel comfortable melting wax and pouring it into candles. All you need to do is set the wick in the center of the teacup and pour the granulated wax all around it. That’s it! The wax will melt when the candle is lit.

Thanks, thesassylife!

Jungle Animal Cupcakes Recipe!

jungle

Jungle Animal Cupcakes Recipe!

I recently took my kids to our local Zoo and they loved it! They asked for a fun animal-themed recipe, so I think that I’ll make these cupcakes! If your kids love zoo animals, as much as mine, then check out this adorable Jungle Animal cupcakes recipe! Let us know what you thought of this recipe and how yours turned out, we’d love to know! You’ll need:

Cupcakes and Frosting

  • 1 box Betty Crocker™ SuperMoist™ yellow or devil’s food cake mix
  • Water, vegetable oil and eggs called for on cake mix box
  • 1 1/4 cups Betty Crocker™ Rich & Creamy chocolate frosting
  • Black food color
  • 2 1/2 cups Betty Crocker™ Rich & Creamy vanilla frosting
  • Yellow and red food color

Lion Decorations

  • 1 1/2 cups caramel popcorn
  • 12 brown miniature candy-coated chocolate baking bits
  • 12 pretzel sticks
  • 12 pieces Cheerios™ cereal (any flavor)

Tiger Decorations

  • 12 brown miniature candy-coated chocolate baking bits
  • 12 orange chewy fruit-flavored gumdrops (not sugar coated), cut in half crosswise, top halves discarded

Monkey Decorations

  • 12 brown miniature candy-coated chocolate baking bits
  • 6 miniature marshmallows, cut in half crosswise, pieces flattened
  • 12 small round chocolate-covered creamy mints

Zebra Decorations

  • 6 round vanilla wafer cookies
  • 24 brown miniature candy-coated chocolate baking bits
  • 6 black chewy licorice-flavored gumdrops (not sugar coated), cut in half vertically

For additional details on how to make this tasty treat, click here!

Check out this super cute DIY for a MINI POM POM PILLOW!

How cute are these pillows!!

Screen Shot 2016-03-02 at 3.55.40 PM

Supplies:
-1/2 yard cotton fabric per pillow
-90-125 pom poms of one color per pillow for larger pillows and 25 small pom poms in a variety of colors for the abstract pom pom pillow
-Poly-Fil stuffing
-12″ embroidery hoop
-felt glue
-white cotton thread
-needle and thread
-straight pins
-scissors

Follow along with A Beautiful Mess!