Tag: DIY

How Do You Paint With Eggs? Find out how!

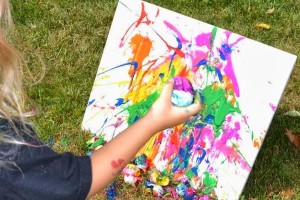
This activity uses recycled eggs, is cost effective, and would totally be so much fun for the kids to play and create at the same time.  You will also get a painting that you will be able to hang and adorn your playroom or kids bedroom walls.  Scroll down to get all the instructions to this fun filled activity.  If you create this, send me a picture I’d love to see your kiddos creations!
eggpainting

Paint Filled Eggs on Canvas


Supplies:
  •  Emptied eggshells
  • Paint (we used washable tempera)
  • Tissue paper
  • A glue stick
  • Optional: A canvas- you could also use poster board or paper

Instructions:

  1. Use a butter knife to gently crack the top of the shells, making a hole big enough for the egg to pass through.
  2. Give the eggshells a quick rinse with warm water and anti-bacterial soap and place them back into the carton to dry.
  3. Fill the eggs with paint.
  4. Fill eggs with paint and toss them at canvas! This project is surprisingly easy to set up and SO FUN!
  5. Seal them using tissue paper and glue.
  6. Use a glue stick to cover one side of a tissue paper square and then gently stick that over each egg opening.
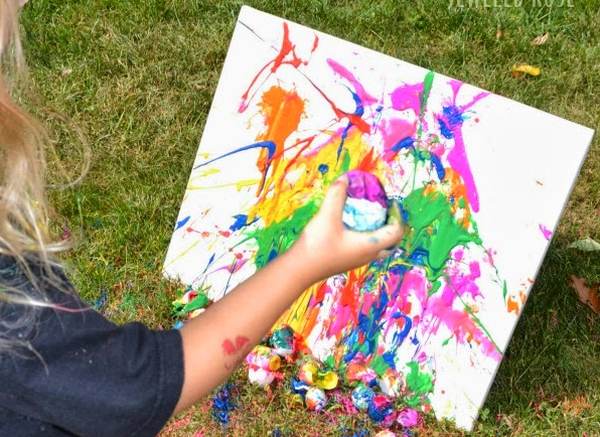
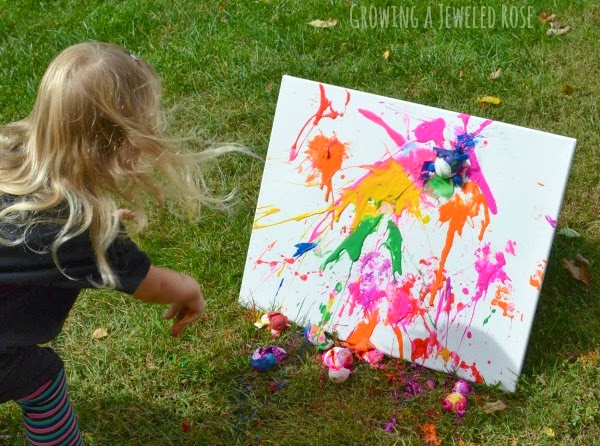
  7. Allow the kids to freely throw the eggs at a canvas.
  8. Let the canvas dry and decorate your wall with your kiddos egg art!
Paint filled eggs on canvas


Easter Bunny Cups and Bunny Bait DIY!

bunny

Easter Bunny Cups and Bunny Bait DIY!

Easter is right around the corner and my kids have already been looking for some fun craft ideas! Your kids will love making these Easter Bunny Cups and filling them with tasty treats! We will make our baskets this weekend and let you know what we thought! You’ll need the following:

  • White paper cups
  • Easter Bunny Ear Template
  • Googly eyes
  • Mini pink pom poms
  • Black wire whiskers
  • Cotton Ball
  • Hot glue or glue dots
  • 1 bag of popcorn
  • 1 cup white chocolate melts

Let us know what your kids thought of this DIY project, we love to hear from our readers. For additional directions on how to make this craft, visit the Giggles Galore Webpage!

Saint Patrick’s Day Treats! Perfect For Your Little Leprechauns!

lep

Saint Patrick’s Day Treats! Perfect For Your Little Leprechauns!

Looking for a fun and inexpensive holiday treat to make with your kids for Saint Patrick’s Day?  Then, make these Leprechauns treats! This is a fantastic way to help your kids enjoy the holiday with festive treats. I have not made these yet, but will do so March 17th! Let us know what you thought of this recipe and how yours turned out.

Ingredients:

  • small pretzels
  • Hershey Hugs
  • Rolo chocolate caramels
  • green M&M’s

For additional directions on how to make this sweet holiday treat, visit the Celebrations Webpage! Oh and do not forget to wear green, you do not want to be pinched!

Easy DIY Yarn or Twine Decorative Balls

I got the idea of these Easy DIY Yarn or Twine Decorative Balls from a friend of mine that has creatively placed her own DIY project all over her house.  You would never know they are a DIY, they are so cute!! I have posted some pictures to give you ideas on how to decorate with the yarn or twine balls. The directions are pretty straight forward, scroll down past the pictures to get to them in the post. If you do this DIY, send me a picture I’d love to see your creation!

twineball yarnballs yarnballs1


Materials

  • Balloons
  • Plastic bags or a dropcloth to cover the floor
  • Cooking spray
  • School glue
  • 1/2 cup cornstarch
  • 1/4 cup hot water
  • Scissors
  • Yarn or twine
  • A mixing bowl

Instructions

  1. Blow up balloons to different sizes (filling balloons only halfway will help you achieve a more spherical shape) and knot each balloon
  2. Create a drying area (If you’re working outdoors or in the garage, hang up a clothesline. If you’re working indoors, suspend a string between two chairs. Be sure to put a dropcloth or plastic bags under the drying area to catch any drips.)
  3. Hang balloons from strings above the drying area
  4. Spray balloons with cooking spray (to make removing the yarn/twine easier later)
  5. In the bowl, mix hot water with cornstarch
  6. Add a bottle of white school glue and mix thoroughly
  7. Dip yarn/twine into the glue mixture and gently squeeze out the excess with your fingers — you may want to wear rubber gloves.
  8. Beginning at the knot-end of your balloon, wrap your balloon with the wet yarn. The more you wrap, the denser the ball will be
  9. Wrap in all directions, top to bottom and side to side
  10. When you’re satisfied with the wrapping, cut the string.
  11. Repeat the process with the remaining balloons
  12. Allow the balloons to dry completely. This may take about 24 hours. The yarn should be stiff and dry
  13. Pop the balloon. Try very gently kneading the balloon before popping it to separate it from the yarn. Remove the popped balloon

Tip: If the ball collapses a little, inflate a new balloon inside the ball to gently push the collapsed spot back into place, and then remove the balloon.

https://www.pgeveryday.com/home-garden/crafts/article/diy-yarn-balls

Thanks, pgeveryday!

Make Your Own Puffy Paint! Easy & Inexpensive!

paint

Make Your Own Puffy Paint! Easy & Inexpensive!

One of my daughter’s favorite Saturday activities is painting! I have to watch her carefully, because paint may end up on the walls. Buying paint can be expensive, even when shopping at Walmart or Target. So, why not make your own Puffy paint at home? What you’ll need:

  • Shaving Cream
  • White School Glue
  • Food Colouring

I have not yet tried this DIY, but I will this weekend. I’ll let you know how it goes. Be sure to let us know how your kids liked this DIY project and what you thought. We always love to hear from our readers.

For additional directions on how to make this paint, visit the One Little Project Webpage.

A Little Gold Paint Goes a Long Way!!


I have stumbled upon a few DIY projects that all have the same theme – gold spray paint!  It’s amazing how a little gold paint really goes a long way in decorating.  Remember- you don’t have to do just gold, you can switch it up to your color of choice.  Let me know if you do any of these super cute DIY’s! I’d love to see how they turn out!

For the kitchen…

magnetletters

Supplies:

  • cardboard or paper
  • plastic primer spray paint
  • gold spray paint

Instructions:

  1. In a well-ventilated area, on a piece of paper or cardboard, start by spraying the back of your letters with the primer. (you can sprayed right over the magnets. They hold just as well with the paint.
  2. Cover both sides of the letters with two coats of the primer
  3. Then follow with two coats of the gold or until the letters are completely painted. Allow time for drying in between each coat.

For a kids/teens/play room, or holiday decor…

chrismaslights

Supplies:

  • Christmas lights
  • paper towels

Instructions

  1. Take your Christmas lights out of the box.
  2. Unscrewed all of the light bulbs and set them aside.
  3. Tear paper towels into 2×2 inch squares and stuff one in each socket to protect from the spray paint.
  4. Then take the wire outside to a well ventilated area and hang from a nail
  5. The paint dries quickly,  in about 10 minutes.
  6. Screw all of the lights back in and you are done

For anywhere… 

goldplanters

Supplies:

  • Terracotta pots
  • White acrylic paint
  • Paint brushes
  • Gold metallic spray paint
  • Cardboard

Instructions:

  1. Flip the pots upside down with the opening sitting on the cardboard
  2. Paint the pots with a base coat of white acrylic paint
  3. when bottom drys flip over pots and give the tops a good paint along with 2 inches into the inside of the pot
  4. when acrylic paint dries take outside to a well ventilated area and paint gold
  5. Paint 2 coats. Let sit until dry.

Saint Patrick’s Day Treat! Lucky Charms Cupcakes Recipe!

cup

Lucky Charms Cupcakes Recipe!

Need some recipe inspiration for Saint Patrick’s Day on March 17th? If so, check out this Betty Crocker Lucky Charms Cupcakes Recipe! My family loves Saint Patrick’s Day and we always celebrate with fun recipes all week long. We made this exact recipe last year and loved it!  Ingredients:

  • 1 box Betty Crocker SuperMoist yellow or devil’s food cake mix
  • Water, vegetable oil and eggs called for on cake mix box
  • 1 container Betty Crocker Rich & Creamy vanilla frosting
  • 3 cups Lucky Charms cereal
  • Green edible glitter

Let us know how your recipe turned out, we love to hear from our readers. For additional details on how to make this festive treat, click here!