Tag: Mason Jars

DIY Festive Fall Mason Jars!

fall-copy
Do you want to add a little flair to your Fall decor but tight on a budget? I love money saving decorating ideas like these Fall Mason Jars! They set a great ambiance in the room too! Below you will find a list of materials and directions!

Materials:
*Mason Jars
*Corn Kernels
*Acorns
*Plastic Pumpkins
*Votive Candles
*Glass Votive Holders

Directions:
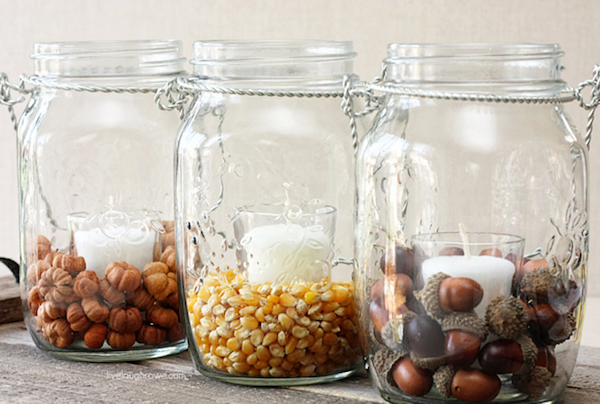
1. Place candle into votive holders and place votive holders in jars.
2. Add your decor around the votive holders almost to the top of the holders.
3. Place candle where you prefer and light!

I had some mason jars at home from other projects and the rest of the supplies I was able to find at the Dollar Store!!

Let us know in the comments below what you thought about this fun and festive DIY! For for cute ideas click here! Remember to be creative and have fun! Happy Crafting!

Too Cute! – Mason Jar Measuring Cups

Mason-Jar-Measuring-Cups

The Mason Jar Measuring cups are too cute I am ordering a set today for myself and one set to give to a friend. I just know every time I use these I will think how cute and it will put a smile on my face as I love mason jars.

Click Here to Buy the Mason Jar Measuring Cups at Amazon! – Free Shipping

Measurements Include: 1 Cup, 1/2 Cup, 1/3 Cup and 1/4 Cup
Dishwasher Safe
Makes a Great Display Piece
Can be Used to Measure Liquids or Solids
Material: Ceramic

Stylish Mason Jar Measuring Cups feature a design inspired by vintage canning jars. Use each layer of the jar to measure liquids or solids; after cleaning, stack the durable ceramic cups into an aqua blue mason jar for a cute countertop display.

Click Here to Buy the Mason Jar Measuring Cups at Amazon! – Free Shipping

DIY Distressed Painted Mason Jars

One of my most favorite thing in life is mason jars.  I store everything in them and decorate with them every chance I get. I love the look of distressed paint on the mason jars.  These painted jars will make the CUTEST Spring look in your home! Below are just a few ideas that you can do with painted mason jars, and the instructions you need to achieve this look are further in the post.  Scroll down, and enjoy!

mason4

mason3 mason1

  1. If you’re starting with a new case of mason jars, you are ready to begin. If using old mason jars,  scrub the jars with rubbing alcohol and then wash with hot, soapy water. Dry completely.
  2. Pick out your favorite type of chalk paint. Rust-Oleum makes a great chalked paint line.
  3. Turn mason jars upside down and start with two coats of paint. Let paint dry completely between coats. If using acrylic paint for your project you have to give the jars 24 hours dry time between coats of paint; otherwise when you apply the second coat it might peel off some of the first coat paint.
  4. Once dry use 80 grit “No-Slip Grip” sandpaper.  Cut into rectangles and then fold over, giving you two sides to work with.
  5. To start the distressing process,  rub the sandpaper along the threads at the top of the jar. Next rub the sandpaper on the ridges, raised edges, and sides of the jars. Rub the sandpaper all over the fruit graphic and along the words.  See pictures (above)  for ideas on where to distress.  Go easy at first, you can always rub more paint off if necessary.
  6. Finish with a sealant. An acetone based clear coat in matte finish is best.
  7. When caring for the jars don’t submerge jars in water or put in dishwasher. Simply wipe down. And take care when filling with water. While the sealant makes the finish much more durable — and the chalk paint offers a much, much stronger bond that’s near impossible to scrub off than acrylic paint — it’s still considered a semi-permanent finish.

Thanks for the instructions, ItallStartedWiththePaint!