Tag: Crafts

Make Your Own Peppermint Cooling Spray!

spray

Make Your Own Peppermint Cooling Spray!

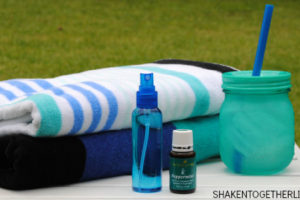
During these summer months, walking just a few feet can make me start sweating! I recently tried this Homemade Peppermint Cooling Spray and it helped me cool down. No joke! I’ve been using this all summer and it is fabulous and easy to make because you only need two ingredients. Want to make this cooling spray as well?  If so, here are the supplies that you’ll need:

  • 2 oz Water
  • 3-5 Drops Of Young Living Peppermint Essential Oil

For additional directions on making this cooling spray, be sure to visit the Shaken Together Life Webpage! Let us know what you thought of this project. We love to hear from our readers.

Ice Paint Super Summer Fun DIY Project!

paint

Ice Paint Super Summer Fun DIY Project!

Want a way to cool off this summer with your kiddos? If so, you must check out this Ice Paint Super Summer Fun DIY Project! I have not yet made this craft with my children, but it looks fun to make. Plus, you do not need many supplies to make this project. Want to make this as well? If so, be sure to pick up the following:

  • Washable paint
  • An ice cube tray
  • Optional: water and/or kool-aid

PS: I was able to find all of these supplies at my local Dollar Tree store!

For additional directions on making this DIY project, be sure to visit the Growing A Jeweled Rose Webpage for additional details. Let us know what you thought of this summer idea in the comment section below. We love to hear from our readers.

DIY Magnetic Scrabble Letters!

IMG_1703 copy
Hey! I have a super adorable DIY I made the other day with my family! Below you will find the materials and directions! This is great to get your kids to help along! Mine did!

Materials:
*wooden scrabble letters
*magnetic tape (found at craft stores)
*scissors

Directions:
1) First you will need to place each wooden scrabble tile on the magnetic tape! I would take a long strip out and place several in a row!
2) Once all of your wooden scrabble tiles have been backed with the magnetic tape, then cut off the excess with the scissors.
3) You are done!
4) Start enjoying hours of fun with these new magnetic letters!

Tips:
These tiles are great for many things! If you have a magnetic board then you can spell words, teach younger kids letter sounds when pairs with other pictures, help them spell their names! Also, you can put them in a shadow box to spell things like I Love You! Really this is all up to you and your creativity!

If you liked this DIY, check out our others over here! Happy Crafting!

Adorable DIY Caterpillar Clothes Pins!

caterpillar bugs copy
With it being summer sometimes the kids get bored, especially if it’s raining! These are the most adorable little critters! Below you will find the material needed and the directions! Remember to be creative too!

Materials:
*cloths pins
*color pom poms
*googley eyes
*craft glue

Directions:
1) take a clothes pin and see how many pom poms will fit!
2) add a bit of glue down the middle of the top of the clothes pin
3) add the pom poms
4) add googley eyes
5) LET DRY!

Additional tips: If you want to personalize your litter caterpillar a little bit, you can paint, add stickers, or color the clothes pins first!

What did you think about this fun craft? Let us know what you thought! Check out our other DIY and crafts here! Happy Crafting!

Pack N Go Kitchen DIY Toy Stove Tutorial!

stove1

Pack N Go Kitchen DIY Toy Stove Tutorial!

Buying a play oven for your children can be pricey. So why not make your own stove? I found this fun Pack N Go Kitchen DIY Toy Stove Tutorial, which looks relatively easy to make. The Printable Creations website has printables and easy to follow instructions. Want to make this craft too? If so, here’s what you’ll need to make this toy stove:

  • Silhouette Cameo or other craft cutting machine that accepts SVG files.
  • Pack ‘n’ Go Kitchen Toy Stove Free SVG Cutting Files
  • Paper trimmer, scissors / X-Acto knife
  • Scraper (or credit card/old gift card, popsicle stick) for burnishing
  • Ruler and pencil (for marking placements)
  • Transfer paper
  • Adhesive vinyl

For additional directions on making this DIY project, be sure to visit the Printable Cuttable Creatables Webpage for more details. Let us know what you thought of this craft in the comment section below. We’d love to know your thoughts.

stove

Wood Spoon Pirate Craft!

pirate
Wood Spoon Pirate Craft!

Want to make a fun project with your kiddos this weekend or over the summer? If so, then check out this Wood Spoon Pirate craft idea. My children love to watch the Pirates of the Caribbean movies! This would be a fun craft to make after watching the movie on a Sunday afternoon. Want to make this project too? If so, you’ll need to pick up the following supplies:

  • wooden party spoon
  • black and red cardstock paper (or the colors of your choice)
  • small googly eyes
  • permanent markers
  • white chalk marker (optional)
  • tacky glue
  • scissors

For additional details on making these fun spoon pirates, be sure to visit the I Heart Crafty Things Webpage for more details. Let us know what you thought of this DIY project in the comment section below. As usual, we love to hear from our readers!