Category: Life Hacks

Bath Salts for Cold and Flu!

bath-salt
Bath Salts for Cold and Flu!

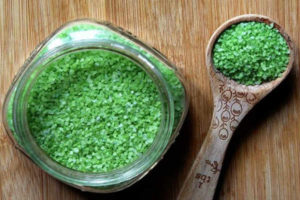
During the colder months, I always like to try different bath salts to prevent the cold and flu! This year, I tried this Bath Salts for Cold and Flu Recipe. Long story short, I loved these bath salts! Nothing is better than eucalyptus oil and vanilla. I plan on making these bath salts again and giving them to my in-laws! You must try this new recipe! Here are the supplies you’ll need:

  • 1 cup Epsom salt or sea salt
  • 1/2 cup baking soda
  • 3 drops eucalyptus essential oil
  • 8 drops vanilla extract
  • Green food coloring if desired

Let us know if you enjoyed these bath salts in the comments below, because we’d love to know. For more directions on making these salts, be sure to visit the Your Beauty Blog for more details.

Mason Jar Tissue Holder DIY!

tissue

Mason Jar Tissue Holder DIY!

Do you have extra mason jars at home? If so, there are tons of crafts you can make with them! I recently found this Mason Jar Tissue Holder DIY project and was inspired. I plan on making some of these tissue holders for my home, because I have tons of unused mason jars. Plus, these tissue holders look so much nicer than the paper ones. Don’t you agree? If you’d like to make this project as well, be sure to have the following supplies ready:

  • Mason jar
  • Mason jar lid
  • Scissors
  • X-acto knife
  • Scrapbook paper
  • Glue stick
  • Hammered bronze Rust-Oleum spray paint
  • Craft Paint
  • Paint brush
  • Stick on craft embellishments
  • Tissue

PS: If you do not have any mason jars at home, head to your local thrift store and pay next to nothing for them!

For additional directions on how to make this craft, be sure to visit The Happy Housewife Webpage! Let us know what projects you’ve made with your family, we love to hear from our readers.

How to Roast Pumpkin Seeds!

seeds
How to Roast Pumpkin Seeds!

Plan on saving those seeds from your carved Halloween pumpkins? If so, do you know how to roast them? If not, you have come to the right place to find out! First, make sure that you cut the pumpkin and scrape out all of the seeds. You will not want to miss any hidden seeds. Second, you’ll need to rinse those seeds, thereby, ridding them of pumpkin guts. To roast them, you’ll need the following supplies ready:

  • One medium sized pumpkin
  • Salt
  • Olive oil

PS: I’ve heard that some people have put a variety of salts on these pumpkin seeds like ranch seasoning. I’ve never tried any of these variations, but let us know if you have. We’d love to know.

For further directions on make roasting these pumpkin seeds after boiling them, be sure to visit the Simply Recipes Webpage for more details. Let us know if you enjoyed this post, because we’d love to hear your thoughts.

Oh Man! I Love When These Drop In Price!

I can never seem to find enough storage containers when it come to put things away! Either I have more lids or more containers! I am glad these are at a HUGE price drop right now! Get this Rubbermaid Easy Find Lids Food Storage Container, 42-piece Set, Red for only $9.95! Regular price on these is $23.38! Hurry and get yours now!

  • Lids snap together and to container bases so you can always find the right lid
  • Graduated sized containers nest for compact storage
  • One lid fits multiple bases
  • Includes: 5 (0.5 Cup), 5 (1.25 Cup), 5 (2 Cup), 2 (3 Cup), 2 (5 Cup), 2 (7 Cup), and 21 Easy Find Lids

Making a Turkey In The Slow Cooker! Can You Do That?

crock-pot-turkey

Making a Turkey In The Slow Cooker! Can You Do That?

Stressing out about the Thanksgiving holiday or an upcoming family event? Well, I recently found a tutorial on how to cook a turkey in the slow cooker, which would alleviate some of that anxiety. I’ve never considered cooking a turkey in this way, but it seems like a great idea! Perhaps, I’ll try using my crock pot like this for smaller gatherings. Here are the basic ingredients required for cooking turkey like this:

  • turkey, thawed and small enough to fit in your slow cooker (or almost small enough)
  • water, enough to barely cover the bottom of your slow cooker
  • 3 T olive oil
  • Italian seasonings or flavorings as desired
  • salt to taste

PS: Wouldn’t shredded turkey like this be great for chili, soups, or ethnic food? I think so!

For more directions on making this turkey, be sure to visit the Practical Stewardship Webpage for more details. Let us know if you’ve ever tried to cook a turkey like this in the comments below. We’d love to know.

Magnetic Cup DIY!

screen-shot-2016-10-20-at-1-10-55-pm-copy
Are your kids going through more cups than you seem to own? I feel like I am constantly washing a new cup every 5 minutes! Not anymore, thanks to this brilliant Magnetic Cup DIY! I have tried this with several different methods, but this works the best! Below you will find a list of materials and directions!

Materials:
*Plastic Cup (you can find these for $0.97 at Walmart or the Dollar Store)
*Magnets (you can find these at the Dollar Store too!)
*Hot Glue Gun & Sticks

Directions:
1. Simply take your clean up and hot glue 2 magnets on the sides on the cup. Remember to place them on the same side just a few inches apart.
2. Let the glue dry!
3. Stick to fridge!

These are the simplest DIY and life hacks for this busy mom! Let me know what you thought of this FUN and EASY DIY in the comments below! I love hearing from our readers! In the mean time check out our other DIY’s here! Happy Crafting!

Dresser Mirror Simple DIY Project!

dresser-mirror-1
Dresser Mirror Simple DIY Project!

Want to make a pretty mirror for yourself or your kids room? If so, you’ll have to check out this Dresser Mirror Simple DIY Project! I haven’t made this fun craft yet, but I plan to very soon. My daughter saw the picture and requested that we make this project together. If you want to make this simple mirror craft too, be sure to have the following supplies on hand:

  • round mirror
  • large, round acrylic tray
  • 2-3 bags of Accent Gems
  • glue that works with non-porous surfaces (E6000 or Glu6 Original)
  • plate stand (sturdy enough to hold mirror)

PS: I was able to find these accent jems, acrylic tray, and plate stand at my local Dollar Tree. If you’d like to save money on the mirror, you can usually find inexpensive mirrors at your local thrift store.

For more instruction on putting together this mirror, be sure to visit the Create & Babble Webpage. Let us know if this project interested you in the comments below. We love to hear from our readers.

jem