Category: Life Hacks

DIY Flower Pot Shelves!

memorial craft copy

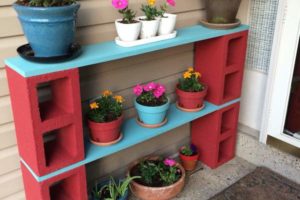
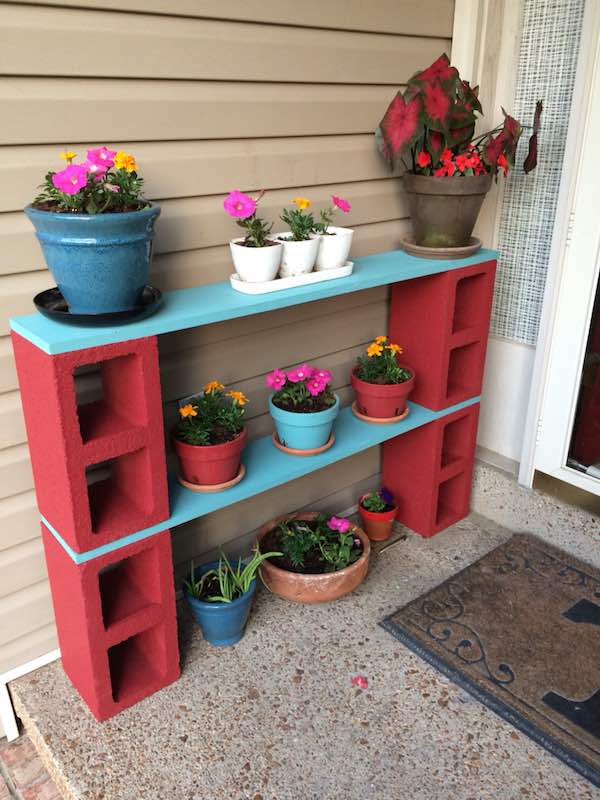
Wanting a fun and festive Memorial Day DIY? Look no further! This super affordable craft can be painted with different colors to match your decor or holidays! Below you will find the simple and easy to follow directions:

Materials:
*4 cinder blocks
*Red Spray Paint (i would find one with a primer in it)
*2 pieces of wood (cut to the correct width of cinder blocks and how over long you want)
*Blue latex paint

Directions:
-thoroughly spray pain the cinder blocks. You might need a few coats as the cinder blocks do absorb some paint. Make sure you lay card board or a cloth down if you want to protect ANYTHING from the spray pain! Let dry completely! While the cinder blocks are drying go ahead and paint both pieces of the wood! You might want to do 2 coats on them! Once everything is dry, it is time to assemble! Place 2 cinder blocks where you want them, add a shelf, and repeat until finished! Add some colorful flower pots and decorations and you are DONE!

If you loved this DIY, check out our others! Remember to give it a personal touch and most importantly, have fun!

Polar Bear Paw Cupcake Recipe!

bear

Polar Bear Paw Cupcake Recipe!

I just had to share this adorable cupcake creation with our readers. Did you know that you can make a Polar Bear Paw cupcake?! Isn’t that just adorable to look at? This would be a great recipe to make with your kids after visiting the zoo this spring or summer. I know I’ll be making this cupcake creation for my kids, because it does not look too complex. If making this cupcake, you’ll need:

  • White Vanilla Frosting
  • Coconut Shavings
  • Oreos
  • Chocolate Covered Raisins
  • Cupcake Liners
  • White Cupcake or Cake Mix

For additional directions on how to assembly this beautiful cupcake, visit the A Few ShortCuts Webpage! Let us know how your cupcake turned out and if it was delicious!

DIY Twine Hanging Flower Pot Cans!

flowers copy

Hanging plants are all the rage these days, right? I love the simplistic look these adorable natural hanging pots! Another great thing about these is that if you don’t have a green thumb (like me), you can put succulents in these pots, either live or fake! Only you would really know! Follow these super simple DIY instructions below to liven up your place!

What you need:
* 2 or more soup cans (cleaned and dry)
* a spool or 2 or twine (any shade is fine, make it personal)
* hot glue works great for this
* a hammer
* a nail

How to make them:
First off you are going to completely clean and dry out your cans. Then you are going to hammer holes into the side of your can near the top opposite from each other, so you can put some string to hang them. Then take your hot glue, twine, and your can. Start at the bottom and dab some glue and place the end of your twine there. You might want to hold it for a second or 2 to make sure it stays. Next you are going to keep doing that while wrapping your twine around the can over and over glue about every other row or every few inches to make sure it won’t come off. You will get the idea as you start working on the 1st one! Once done, go ahead and run some twine through the holes you made earlier with the hammer and nail. Tie twine together to hang. Add dirt and a flower if you are going to live route or some paper, foam, dirt, or whatever if you are going to fake route! If you don’t want to hang them, they are also super cute placed in groups together around the house; in the bathroom, entry table, kitchen table, dresser, or where ever else you would like!

Did you love this fun quick and easy DIY? We would love to see your personal touches on these beauties! Let us know what you thought of these!Check out our other DIY ideas!

Cooling Sunburn Treatment!

cool

Cooling Sunburn Treatment!

We love to bring our readers life hacks that are genius! Today is no different! To treat sunburns, why not freeze aloe gel? You can put the gel in an ice try, freeze it, and then put it on your sunburned skin! Not only will this help with the puffiness and ache of your skin, but will help cool it down. Isn’t that such an amazing idea? You’ll just need these two things:

  • Aloe After Sun Gel
  • Ice Cube Tray

That is it! You can find this gel at any Walmart or Target store by the sunscreen and lotion. The pictured tray is from Ikea, so you can head over there for this heart shaped mold.

For additional tips, tricks, and life hacks be sure to visit the Pretty Gossip Webpage. Let us know what ideas you’ve come across in the comments below! We’d love to know and share with other readers!

Make a Recycled Can Bird Feeder!

feeder

Make a Recycled Can Bird Feeder!

Recently, my two boys found a cute bird nest in our backyard! It even had a little egg, which was adorable! So, they wanted to make a feeder for this bird family. I’ve never made one before, so I found a simple one for my kids! Plus, it is pretty thrifty as well! Here is what you will need:

  • Used coffee can with plastic lid
  • Can opener
  • Craft paint
  • Paintbrush
  • Scissors
  • Duct tape
  • Yarn
  • Birdseed

How did your bird feeder turn out? Did you enjoy making this with your kids. Be sure to keep visiting our webpage for additional DIY craft ideas. For further instruction on making this bird feeder craft, be sure to visit the Mom Tastic Webpage.

Make Your Own Ladybug Golf Balls!

lady

Make Your Own Ladybug Golf Balls!

Do you have a garden and want to decorate? If so, then you must try this ladybug golf ball DIY project! Golf balls can be pricey if purchasing them at your local Walmart or Target store. I’d suggest heading by your local thrift shop and picking up a whole bag for around $1-$2. I know that my kids would love to help me make these!

Want to make these yourself? If so, you will need:

  • Golf Balls
  • Sandpaper
  • Primer Spray Paint
  • Acrylic Paint (Red, Black, White)
  • Varnish
  • Paintbrush

How did your DIY project turn out? Have you done a similar craft before? Feel free to share your thoughts in the comments below. For additional directions on making this idea, be sure to visit the Crafts Ideas 2 Live 4 Webpage!

Flower Pretzel Bites! Perfect for Spring!

snack

Flower Pretzel Bites! Perfect for Spring!

Want to make a fun spring treat that will brighten your kitchen and put a smile on your kid’s faces? If so, then you have to make these fun Flower Pretzel Bites! Candy and white chocolate are on the pretzel, but they are far healthier than eating a candy bar. Plus, this is a easy way to help your kids with portion control. You’ll need the following ingredients:

  • Wilton White Candy Melts
  • Waffle Pretzels
  • Pastel M&M’s

For more directions on how to make this spring treat, be sure to visit the Freeie Finding Mom Webpage! Fore more DIY hacks, recipes, and crafts, be sure to visit our Thrift Momma Ramblings Webpage!  Let us know how your flower pretzel bites turned out, we’d love to know!