The Complete Guide That Makes HDR Photography Super Simple

More than 95 million photos are uploaded to Instagram each day. Some estimates say that the number of digital photos taken each year is in the trillions.

Digital photography has come a long way over the years. Google and other smartphone makers continue to push the envelope to make smartphones better than professional camera equipment.

Canon, Nikon, and Sony are keeping up. All of these companies enhance the software of the camera. One of the areas that’s seen the most growth is HDR photography.

You’ve probably seen HDR photos and not realize it. If you want to give your photos a stunning look that’s worthy of a lot of likes on social media, keep reading.

This guide shows you everything you need to know about HDR photography.

What Is HDR Photography?

HDR stands for High Dynamic Range. It allows photographers to capture several images of the same thing, then merges the images into one photo.

The photos get taken at different exposures, one light, medium, and dark exposure. This lets photographers capture an image with more detail and

You can create an HDR image with as little as two images or as many as nine. It depends on how mush storage space you have and your camera’s settings.

When to Use HDR Photography

HDR photography was insanely popular several years ago. People saw this new setting on their cameras and they wanted to experiment with it.

The problem is that most don’t know the basics of photography, so good images were made awful because the technology was misapplied.

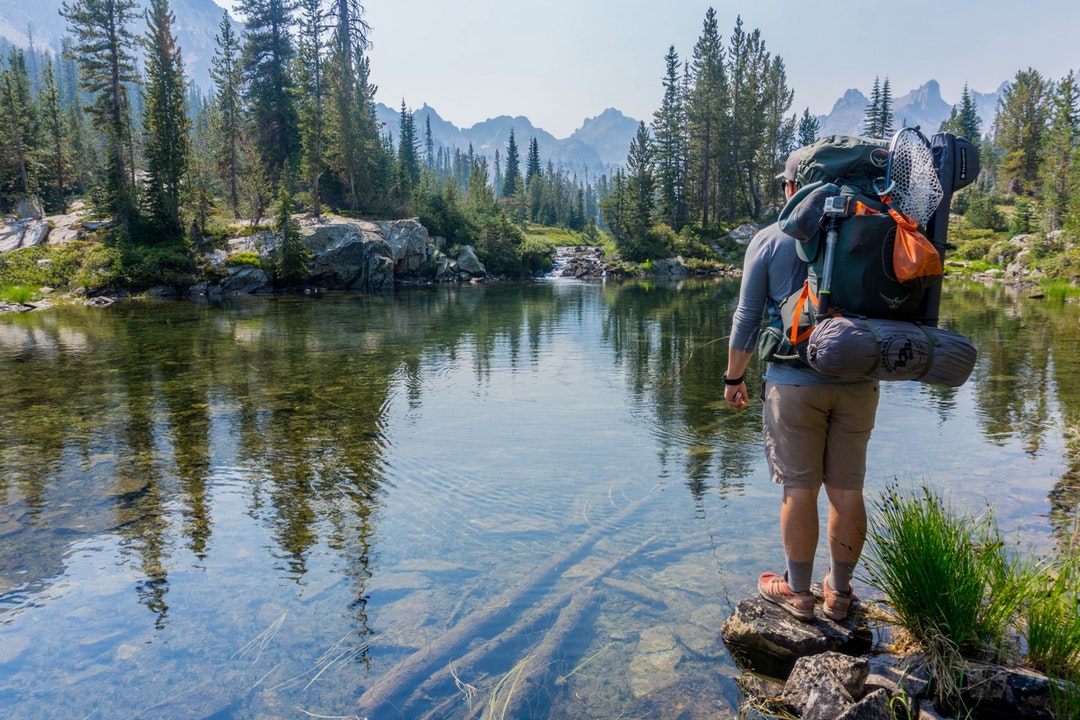
HDR photography is great for landscape and architectural photography. You’re able to capture small details of a scene because you’re able to shoot at different exposures.

It’s also used by some professional photographers in food, fashion, and product images. Discover more here to learn about these areas of photography.

A dark exposure captures shadows, while a light exposure creates a brighter image. Medium exposures capture colors.  

When should you avoid HDR photography? Don’t use it for areas of photography that have a lot of movement, unless that’s what you want from the image.

For instance, expert photography in sports requires that images are sharp and capture the most intense moments. Since you take several photos with HDR photography, the subject won’t be still long enough to capture and merge the images into one clean image.

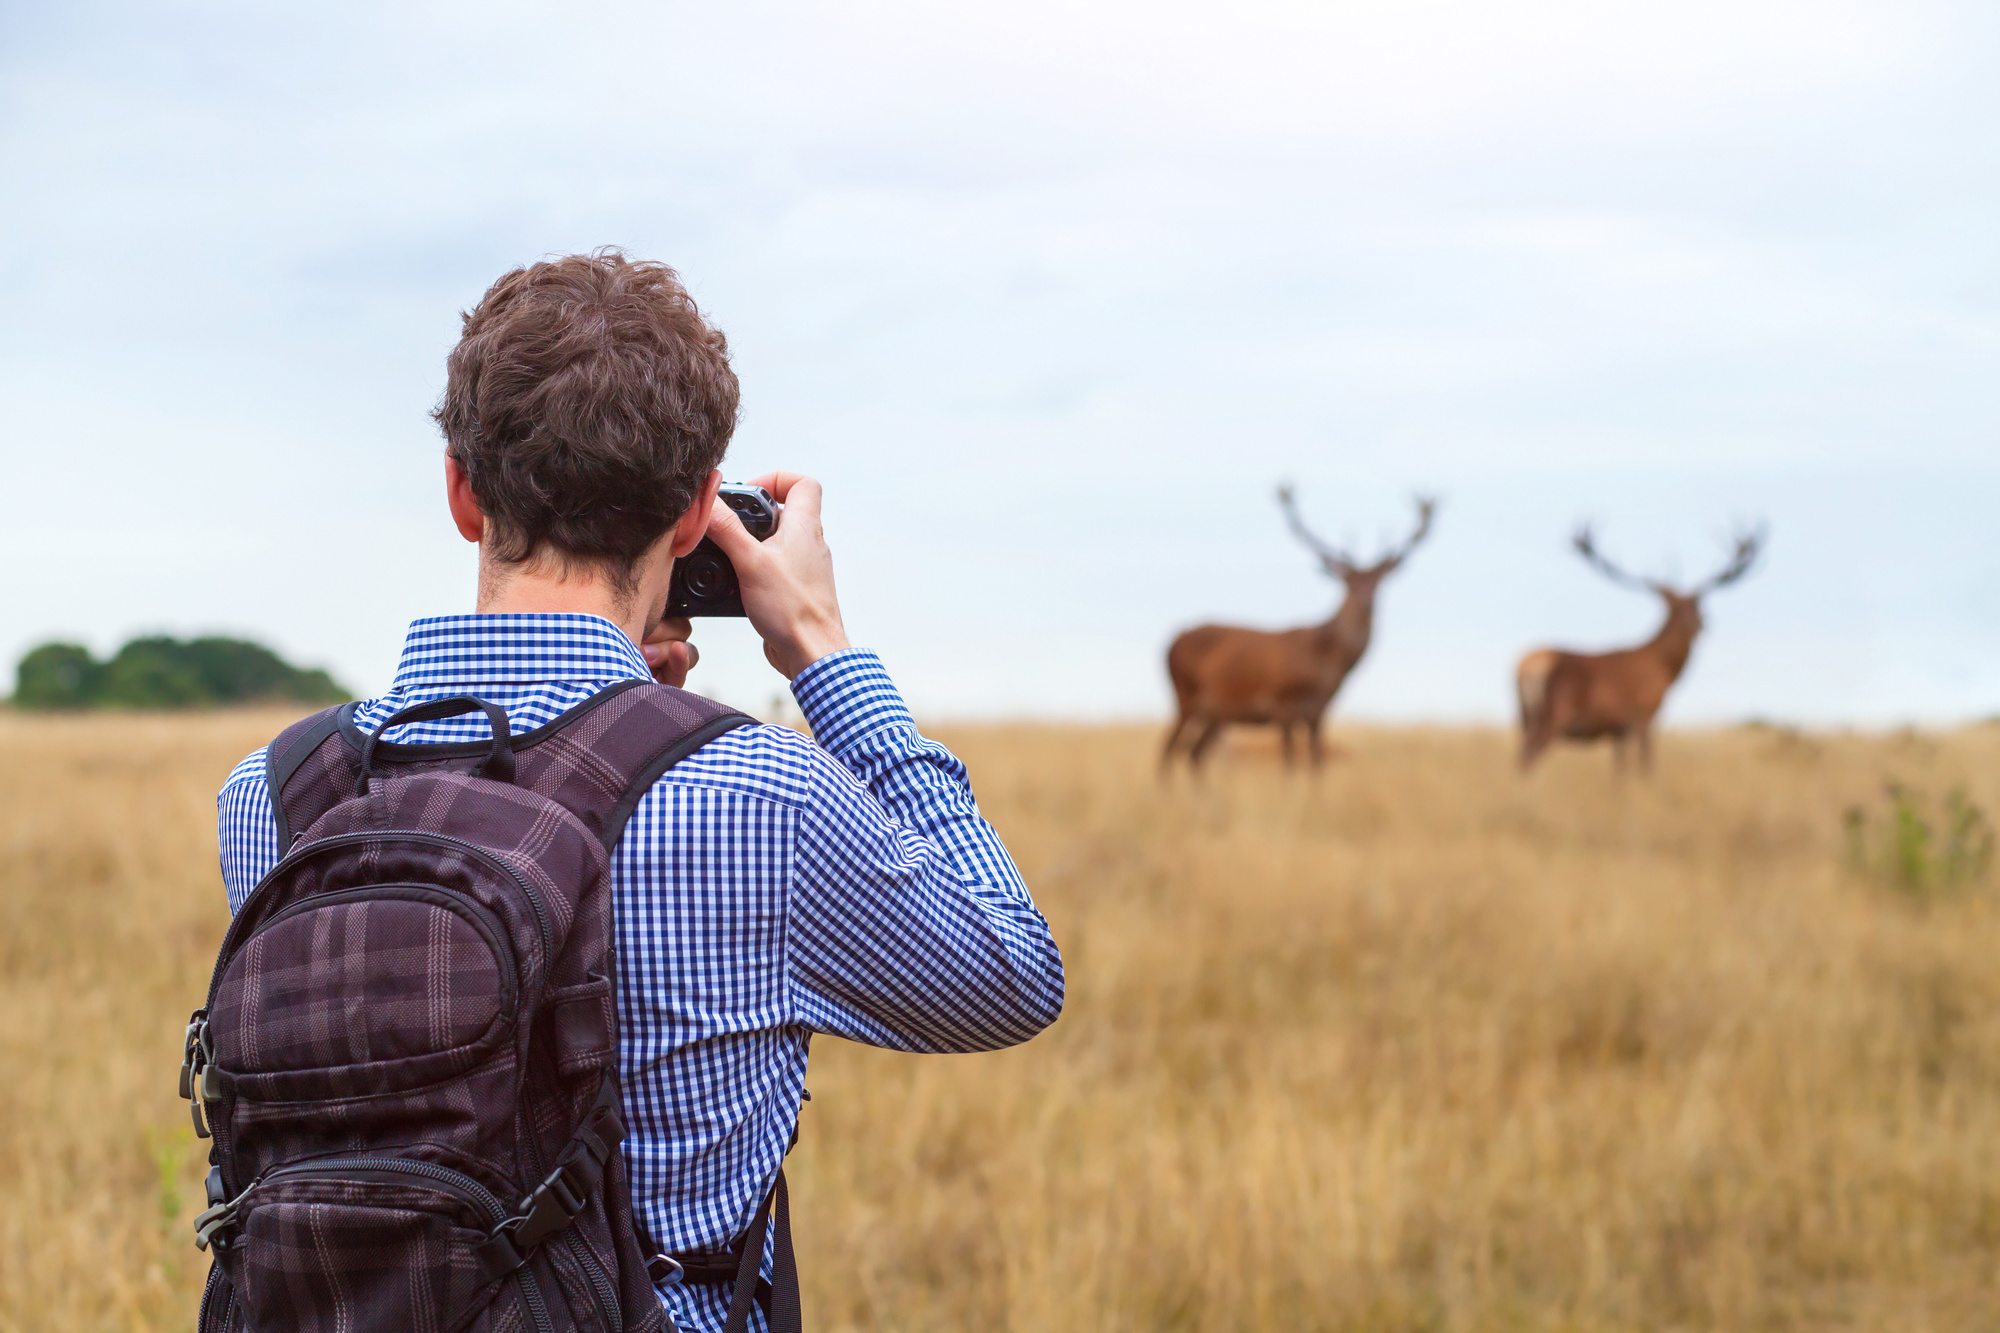
It’s the same with wildlife photography. Animals are unpredictable, and it’s very hard to get one sharp image, let alone up to nine.  

Understanding Exposure Values

There are three ways to make an image light or dark. You can adjust the ISO, shutter speed, or aperture. If you adjust the ISO too high, you can create a grainy image.

The shutter speed impacts the movement of an image. For instance, a slow shutter speed shows motion like trees moving in the foreground. A fast shutter speed freezes an image in an instant, creating a sharp image.

Aperture is the amount of light that enters through the lens. This is expressed in f-stops. The higher the f-stop, the less light enters the camera and the darker the exposure.

A lower f-stop allows more light to enter the camera, so you have a brighter image.  

Each setting affects the overall composition of the shot. Lower aperture settings create a blurry background, like the portrait setting of your smartphone camera.

A higher f-stop gives you a much sharper image in both the foreground and the background.

That’s what makes HDR photography so useful. HDR photography adjusts the exposure without adjusting your settings. You don’t have to compromise your composition to create the image that you want.

Check the Camera Settings

How do you get started with HDR photography? Start with your camera. Smartphone users can go into their camera app’s settings and turn HDR on or off.

If your smartphone doesn’t have an HDR option, download an app like True HDR or Bracketeer.

In DLSR photography equipment, you’ll set your camera settings to HDR mode. You’ll also set your camera to manual mode and adjust the ISO to the lowest setting possible.

Adjust the shutter speed and aperture to the settings you want for your image. Test a few shots to make sure you’re capturing the image.

Use a Tripod

A successful HDR image hinges on the ability to hold the camera still for a second or two. That seems like the easiest thing in the world, but it’s not with a camera in your hands.

You make small movements as you breathe and the camera picks up that movement. That’s called camera shake. It’s the reason why your photos might not be as sharp as they could be.

A tripod connected to a shutter release device reduces camera shake. Make sure you use one with HDR images.

Make Your Images Natural

Many photographers used HDR photography because it gave images an illustrated or fantasy look. The unfortunate part is that too many photographers went overboard with this.

Images of stunning sunsets didn’t look natural. It’s similar to shots of old buildings in a field.

Professional photography dictates that the technology should enhance the natural beauty of your images. The technology shouldn’t dominate the images and make them appear fake.

Keep this in mind as you experiment with HDR images.

The Best Tips to Learn HDR Photography

Out of all of the great technologies in professional photography, HDR continues to remain a favorite. That’s because it has the potential to draw out the finest details and colors of an image.

You don’t have to compromise your vision, but you do need to make sure the image looks natural. Be sure to use a tripod to make your image clean and crisp.

You’ll have Instagram-worthy photos in no time.

If you enjoyed learning about photography, head over to the Earn money section of this site to learn how to turn your hobby into cash.

Top 3 Backpacking Tips You Should Know For Your Next Hike

Did you know, almost half of American citizens take part in outdoor activities every year?

Backpacking at home or abroad is a fulfilling and exciting experience. Whether you’re a first-timer or a seasoned pro, a few simple hacks can make your future outings exceptional.

By following our helpful guide, you can learn how to backpack and hike in style, safety, and security. 

It’s time to hit the road! Read on for our top three backpacking tips.

1. Plan Your Route

Select a route depending on your skill and experience. How many days are you planning to hike? Do you plan on camping overnight? What is your budget for food?

Whether you’re planning a rural hike or urban adventure, you should always have an end goal in mind. This will help you to navigate and plan your next adventure. If you’re planning an extended trip, consider breaking it down into parts. 

There is a vast range of backpacking opportunities out there, perfect for all skillsets. Do your research before embarking to truly make the most of your expedition and reach new heights!

2. Get the Right Equipment and Supplies

Hiking with a backpack can be rewarding but challenging. Having the best equipment and supplies can make your next trek one remember.

Having planned your trek, consider your circumstances. Will you have easily accessible medical care? If not, expand your first aid kit. When will you next buy food? Always have sufficient instant food solutions to hand. 

A well-stocked backpack will revolutionize the way you travel. Pack as light as possible, but always be sure to carry essentials such as a first aid kit, compass, and a flashlight.

Check the forecast and be environmentally aware – ensure you have the right equipment to deal with the climate.

3. Don’t Forget Backpack Security

When backpack hiking, you entrust your pack with your every need. Losing your backpack or possessions could mean disaster for your next trip.

Never leave your backpack unattended. If you stop in at a restaurant or port of travel, always hook your backpack around your leg or shoulder. This will deter potential thieves from cutting your adventure short.

If you have to stow your backpack during your travels, use a strong padlock to ensure the safety of your equipment. Consider investing in a backpack net to keep your belongings safe while on the move. 

If you want to learn more about backpack security and how to go backpacking, visit backiepackie.com.

Backpacking Tips For Your Next Adventure

With these three backpacking tips, you can rest easy on your next hike.

Our easy guide shows you how a well-planned route, thought-out inventory, and secure backpack can make your next expedition a breeze.

Did you enjoy this post? We offer essential advice on a wide range of topics, so be sure to check out our other posts for more information on health, fitness, travel, and more. 

A Quick Guide to Cool Sculpting

Most of us have tried a diet or two in our lifetime, and we can all agree that they’re not fun. They leave you feeling hungry and craving just a taste of your sugary morning latte. 

But what if you could achieve weight loss without having to go through the horrors of restrictive diets or rigorous exercise routines? If this sounds like your kind of weight loss technique, then you need to learn about cool sculpting. 

What Is Cool Sculpting?

Before we jump into the nitty-gritty of cool sculpting, let’s take a second to talk about what cool sculpting actually is. Cool sculpting is a procedure that uses a combination of suction and extremely cold temperatures to freeze fat cells and cause them to disintegrate.

During a cool sculpting treatment, an esthetician places a suction on areas of the body where the patient wants to remove fat. Then, the area is sucked into the machine and cooled down to temperatures of 39 degrees Fahrenheit which damages the fat cells. 

From there, the area is massaged to help break up the fat cells so that your lymphatic system can flush them out. Over the next few months, your body will start to slim down as the fat is removed from your body!

Does Cool Sculpting Work?

If you’ve ever seen cool sculpting before and after pictures, you might feel skeptical. The results can be pretty dramatic, leaving you to wonder if they’re real or not. 

The truth is, cool sculpting does work and it does provide you with those life-changing benefits you’re looking for. However, the results won’t be immediate. It typically takes 3-6 months for you to start really seeing the difference after your treatment. 

What Are the Benefits of Cool Sculpting?

There are many cool sculpting benefits for anyone who is interested in giving this treatment an sht. Let’s take a look at some of the main advantages of using cool sculpting.

1. It’s Painless

One of the first benefits of cool sculpting services is that it’s a completely non-invasive treatment. There is no surgery required, which means that it’s completely painless. The only side effects are that you may feel some tugging and pressure at the treatment site!

2. It’s Fast

Cool sculpting treatments don’t require any downtime, which means that you don’t have to worry about taking time off from work or from your daily life. In fact, since cool sculpting procedures last between 30 and 60 minutes, you can even squeeze the treatment into your lunch break!

3. The Results Last

Since cool sculpting works by destroying fat cells and permanently eliminating them from the body, the results are permanent. As long as you maintain your weight, you’ll be able to enjoy your new, slim shape for years to come!

Achieve Your Weight Loss Dreams

With cool sculpting, you can get your body back on track and start looking the way that you want. Gone are the days of crash dieting and sweating like a pig at the gym. With this simple yet effective treatment, you’re ready to get the body you’ve always wanted without any of the pain. 

Did you find this article helpful and fun to read? If your answer was a resounding yes, be sure to hit the subscribe button so that you don’t miss out on any of our other posts!

At Home Physical Therapy for Knee Pain: 5 Effective Exercises to Try

Did you know that as many as 25% of adults suffer from chronic knee pain?

If you’re among this group, then you might be wondering what you can do to alleviate your symptoms. Lots of experts suggest going to physical therapy on a regular basis, but this option isn’t accessible or realistic for everyone’s budget or schedule.

Is it possible to do at home physical therapy for knee problems? Keep reading to learn about 5 different exercises you can try to achieve a pain-free lifestyle.

1. Bridges

Bridges are a simple exercise that requires you to lay on your back with your feet planted on the floor and your arms flat with palms facing the ground. The goal is to lift your hips up to the sky while engaging your glutes. Bridges are especially helpful for people who are dealing with knee injuries because this exercise uses your body weight instead of heavier gym equipment.

2. Leg Extensions

Leg extensions are also effective but simple because you only need a chair to get started. Sit with your feet planted hip-width apart then raise each leg straight up one at a time as high as you can go before lowering back to the ground. This will strengthen all your leg muscles while gently stretching your knee so you can experience less pain in the future.

3. Hamstring Curls

One of the best exercises for knee pain is hamstring curls because it targets plenty of muscles that support your knees, such as your hamstrings, glutes, and core. To do a hamstring curl, stand tall and lift one leg at a time up and back toward your glutes before switching to the other side. As you go through these reps, try your best to balance on one leg and keep your hips pointed forward.

4. Straight Leg Raises

Lots of people who have knee pain enjoy doing straight leg raises on taping tables to support their back. Straight leg raises start in a similar position as bridges, but you’ll only have one foot planted on the ground while the other is stretched out. You’ll begin by squeezing the quadricep of your extended leg and lifting it off the ground as high as your knee then holding it for 5 seconds.

5. Side Leg Raises

Anyone who has knee problems should strengthen their hip abductor muscles to give extra support to their knees. To do this workout, lay stretched out on your side with your head propped comfortably. Lift and lower the leg that’s on top to feel the burn before flipping onto your other side.

Now You Know How to Do at Home Physical Therapy for Knee Pain

Lots of people wonder if it’s possible to do at home physical therapy for knee pain. With this guide, you can feel empowered and start seeing positive results almost right away.

Did you enjoy this article on at-home physical therapy? If you want to know other ways you can nurture your health, our site has everything you need to flourish. Check out our blog to find more great wellness tips.

How Do I Choose a Professional Cleaning Company in My Local Area?

The average American spends almost 24 hours a month cleaning. That’s a full day gone!

With that, many people are turning to residential cleaning companies. These people can come to your home once for a deep clean or visit on a regular basis to keep your home looking and feeling great.

It saves time and, often, money, and the job they do is invaluable.

If you’re thinking of getting some professional cleaning, how do you choose the right company? By considering all of these factors. 

Listen to Referrals

The first thing you should do is simply ask around to get the ball rolling.

If you’re not sure where to start, ask friends and family if they’ve had professional cleaning done and what they thought of it. They might have a local cleaning company to recommend — or one they recommend you stay away from!

You can also post on social media and ask for people’s suggestions. That way, you can curate a list of companies to look into and talk to. This is often the best way to get started. 

Consider Reviews

When you have some house cleaning services to check out, consider their reviews. 

If they’re a very new company, they may not have many to think about. If they’ve been around for a while in the cleaning industry, however, there should be some reviews to check out on places like Google and Yelp.

If they have very low ratings, think twice. Look at the one-star ratings and consider why they were left.

Sometimes customers are unreasonable, and sometimes they’re not! It’s usually easy to tell from the reviews and responses.

Reviews aren’t everything, but they tell you a whole lot about the company. 

Ask About Experience

Most of the best home cleaners will have a lot of experience behind them. This isn’t true of everyone, of course — there could be some new companies who are great at what they do — but if you don’t want to take any chances, they should have a lot of experience behind them.

Ask how many years they’ve been in business and what kind of places they’re used to working with. You can also ask to talk to past clients to make sure they do a good job, as sometimes a lot of experience doesn’t mean good experience!

Consider Your Schedule

You should make sure that the cleaning company can work on your schedule. If there are only certain days when you’re happy with someone cleaning the house, that’s one of the first things you should ask about.

They might be booked up on those days, or not work them all!

This could be dependent on whether you’re home or not, or simply the days you need the house to be extra clean. Your reasoning is your own, but the residential cleaning company you choose needs to be able to work with that. 

Consider Their Communication

Their communication style needs to be good for you too. Do they have an online booking system? Do they text, e-mail, or call?

Whatever your preferred communication style is, matters. Some companies may be old-school and not have anything except calling, and others may be more text-based.

There’s nothing wrong with either method of communication, but it needs to work with what you’re comfortable with. 

Weigh the Costs

People are often surprised that residential cleaning companies can end up cheaper than doing it yourself. This is because if you’re doing it yourself, you have to buy equipment, supplies, etc. If a deep clean or anything specialist is needed in your house, it can add up!

A cleaning company has all their own supplies, which helps.

This, of course, is only true if the company is reasonably priced.

You should ask them for a quote and weigh up every consideration when it comes to cost. Never go with the cheapest company automatically without considering everything else, or you might end up with a bad job being done.

However, if you weigh up the cost in consideration with everything else, you should end up with a solid choice.

Consider What Matters to You

There’s also something else to consider: what matters to you personally, about processes?

For example, you might have pets and need pet-friendly supplies to be used so that they don’t end up accidentally poisoned. You might need someone who’s understanding that your cat is shy, and will work around them. Or you might feel passionate about the environment and want a particularly green company.

Whatever matters most to you and your house, you should take it into account. There’s a cleaning company out there for you, so no need to compromise!

Go With Your Gut

In the end, you also have to weigh up everything and consider how you instinctively feel about the company you’re considering.

If you don’t feel good about them, consider why. Do they not work with your schedule? Do they seem unprofessional? Can’t get those bad reviews out of your head?

Whatever the reason, you should ultimately feel good about whoever you choose. 

Now Get Some Good Professional Cleaning

If you take all of these things into account when choosing a company to do professional cleaning for you, you’ll end up with a good one. Remember to read reviews, ask about their communication and scheduling, and ultimately choose the one that feels good for you.

Remember, if you have one who isn’t working out, there’s no shame in switching either. 

For more home tips about things like saving time and money, check out the rest of our site. 

5 Key Signs For a Man to End a Marriage

Women initiate 7 out of 10 divorces.

The reason is that most men tend to be oblivious of when things aren’t working in their marriages. That’s why many men are stuck in bad marriages and don’t realize it. They don’t know when it’s time to end a marriage.

Besides, men tend to be stubborn and assume they can fix everything. As a man, it’s wise to know that you cannot control everything. You need to learn when to let things go and accept that your marriage is over.

To help you out, here are five key signs for a man to end a marriage.

1. Your Wife doesn’t Support Your Ambitions

As a man, you need someone to believe in you, someone to support you pursue your dreams. So, it’s unfortunate when your wife doesn’t share your ambitions and dreams. It’s even more demoralizing when your spouse doubts your capability and makes fun of your vision.

So, if you’re in such a marriage, you should consider getting a divorce.

2. Infidelity

Maybe for the past few weeks, you’ve been suspecting that your wife is unfaithful to you. The only problem is that you can’t confront her without any proof. That’s why you need to learn how to catch her cheating on you.

Once you gather the evidence, it’s time to end the marriage and move on.

3. You Argue all the Time Over Useless Things

Although it’s normal for couples to argue, you need to monitor your disputes. Something is terribly wrong in your marriage if you argue over useless things every day. So, this shows that you don’t share common values and goals and it’ll be impossible for you to live together for long.

4. You Hate Going Home

The other sign that your marriage isn’t working out is when you notice you hate going home. That’s why after work you prefer going out with friends to clubs until after hours. You’re doing this because you want to limit the time you spend with your life, which isn’t good for your marriage.

So, if you no longer enjoy your wife’s company and hate spending time with her, it may be time to end the marriage.

5. You Have Feelings for Another Person

You should also consider ending your marriage if you’re developing strong feelings for another woman. You may even be considering cheating on your wife. So, to avoid causing her pain by being unfaithful, you should do the right thing and end the marriage if you no longer love her.

Stop the Pain by Knowing When to End a Marriage

Being in denial that things are not working in your marriage will not solve anything and only causes you pain. That’s why as a man, you need to learn when to end a marriage. Yes, ending a marriage is painful, but it’s better than being stuck in a bad or unhappy marriage.

For more Family Life content, please see our other blogs.

5 Creative Things to Put Into Your Marriage Proposal Speech

“Mawwiage. Mawwiage is what bwings us togeder today.” Are you ready to pop the question?

Don’t propose like Mr. Darcy or Mr. Collins. If you have not seen or read Pride and Prejudice, at the very least, google their proposals, so you know what not to do. 

Your marriage proposal speech is a story that will be with you and your future spouse forever. Make it a story that she (or he) is proud to tell and inspires reactions of “awwwwwww” from friends. 

Keep reading for five creative things to say as you lead up to the big question, “will you marry me.”

1. Put Your Heart in It

When you are proposing, you want to be sure to express your heart. A marriage proposal should not be about the benefits of getting married; just ask Mr. Collins after his failed proposal to Elizabeth Bennet. 

In contrast, when Mr. Darcy told Elizabeth, “you must allow me to tell you how ardently I admire and love you,” now that’s heart. His first proposal may have failed, but his later declaration of love was perfect. 

Put your heart into your proposal and tailor it to you and your partner. If you are not a sappy couple, don’t be sappy. But do take the time to express your love and feelings. 

You can leave your partner with warm fuzzies even if you are not the sappiest chap. 

2. Use Personal Experiences

A marriage proposal is personal. Utilizing personal experience in your proposal can make it uniquely you. 

For example, if you want to say something like, the day I met you, you can include details about what they were wearing, doing, saying, or something else unique from that day. 

Or you could choose to describe the day you realized you wanted to spend forever with them. What about them brought about that decision? 

If you want to get a little cheesy and funny with it, include a hobby you both enjoy. For example, if you both love doing puzzles, use words that draw on that hobby. 

In this scenario, you could say something like, “my life was incomplete until the day I met you; you are the missing puzzle piece from my heart.”

If you enjoy rock climbing, you could say something like, “will you climb with me through the rocky parts of life and ascend to new levels?”

Yes, it may be a little cheesy, but it will be something she (or he) remembers forever, and a little humor in your proposal speech helps inspire the aww factor. 

3. KISS

At the end of your proposal speech, you will hopefully hear a YES and get a kiss. However, that’s not the kiss we are talking about here. This will help you get to the kiss faster, though. 

In this case, KISS stands for Keep It Super Simple or Keep It Simple Stupid; you choose your favorite. 

Shakespeare is great; however, when proposing your proposal should not turn into a Shakespearean soliloquy, unless you both love Shakespeare, then have at it. 

Don’t drag it out. Use a few sentences that express your feelings in a fun and unique way and then ask that question!

Not only will it get you to the kiss faster, but it will also get you to holy matrimony and planning your wedding destinations abroad faster. 

4. Be Yourself

If you have ever seen the TV show Brooklynn Nine-Nine, Jake’s proposal to Amy is a perfect example of all of the elements we have discussed so far. 

However, what makes it better is that he is himself. This proposal is uniquely him and sweet and inspired the awww factor amongst many fans. 

If you want your proposal to be the best, be yourself. It is likely you will be nervous already, do not make your proposal even more nerve-wracking by trying to be someone you’re not. 

When your partner agrees to marry you, they know what they are getting. Be yourself and let that shine through. 

5. Don’t Forget to Ask

When it comes to the end of your speech, do not forget to drop to one knee and ask the question your partner has been waiting for. 

Your proposal speech may be excellent, but if you do not remember to actually ask, then you may leave your partner not knowing what to say. If you do not want to say the typical words, you can also say things such as:

  • Will you be my wife
  • Will you by my husband
  • Will you spend the rest of your life with me
  • Will you be mine forever
  • Will you make me the happiest person alive

A great example of a proposal where the proposer almost forgot to ask is from Downton Abbey and Matthew and Mary. Mary had to remind him that he needed to properly ask. 

Plan Your Inspired Marriage Proposal Speech

At the end of the day, just don’t be a Mr. Darcy or Mr. Collins. Take the time to plan what you want to say and practice! 

Even if you are in a long-term relationship, the nerves can hit when it comes time to propose. As you move from your current dating phase to engagement, make it unique, and a moment your partner will remember forever. 

Happily Ever After

Are you ready to start your happily ever after? Use the tips discussed to craft the perfect marriage proposal speech and head into the sunset with your intended. 

Did you enjoy this article? Check out more articles on our website for tips, tricks, and ideas to inspire your life.