Tag: Frugal Living Tips

TMR Frugal Living Tip #77- Split Portions When Dining Out!

split-portions

Today’s thrifty living tip is to split portions when dining out. It’s an oldie but goodie. Many restaurant portions are too big for one person to eat in one sitting. I either try to split the entree with someone else or take half of it home. It will not only help you by not eating too many calories, but it also stretches the entree into two meals. This is cheaper and healthier. If you are at a fast food place, why not order off the kids or dollar menu. I have started doing this by ordering just a burger and then eating a few fries from my husband.

TMR Frugal Living Tip #75

Today’s thrifty living tip is use cloth napkins and dish towels over paper napkins and paper towels. This will save you lots of money over your life. I still use paper towels from time to time, but a super sized pack will last me for months. I usually buy one or two of those 8 roll packs on sale at CVS yearly. I have the same pack of napkins I got on sale over two years ago. I just rarely use them. I would much rather use my cloth napkins and towels.

I buy the dish towels on clearance and stock up. I make my own napkins by cutting out the size I need and serge the edges so it doesn’t ravel in the wash. These napkins will last for years. If it’s a big spill then I find the dish towel will clean up the spill quicker, and I don’t have to waste several paper towels. When they get to a point that I can’t use them in the kitchen, then they become cleaning towels. I really try to use them up as much as I can before discarding. We all know it’s better for the environment, but it’s also much better for my pocket book.

TMR Frugal Living Tip #74

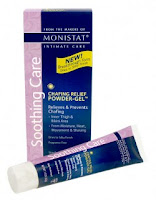
Monistat as a Makeup PrimerToday’s thrifty living tip is instead of using an expensive makeup primer, you can use Monistat Chafing Powder-Gel. You read this correctly Monistat. I can hear you saying I am not putting stuff made for feminine itching on my face! Gross!

I realize this sounds a little crazy but it really works great as a makeup primer. The reason it works so well is that it contains dimethicone which is the same ingredient that the other expensive makeup primers use. It’s a fraction of the cost plus you will get more for the money.

I was skeptical at first as I have used MAC primer which is wonderful. I never tried Smashbox, but I know it’s another very popular makeup primer. I found it at my local Wal-Mart for $6.37 plus tax, and I read that it will last for at least a year. You don’t use much as in the size of a dime. Trying is believing, and it really does work!

I live in very humid south Louisiana and if the heat doesn’t melt off your makeup then the humidity will. My makeup still looked wonderful at the end of the day especially my eye makeup. I couldn’t believe how well this stuff works and for a fraction of the more expensive primers. I also have oily skin but my face doesn’t look like an oil slick at the end of the day. My foundation went on flawlessly and it just feels nice. Some people say it can be hard to find and not found in Canada.

Leave me a comment either if you have tried it or you want to try. I would love to hear from you.

TMR Frugal Living Tip #73

Today’s thrifty living tip is use cheap hairspray, in a can, to stun roaches. We get the big tree ones in the house, and sometimes they move too fast before I get a chance to smack them. I use a can of cheap dollar store hairspray which stuns them so I can smack them. It’s cheaper than roach spray but probably not better chemical wise. Of course you can buy an all natural roach spray that is good for the environment. I also use a very heavy coffee table book that I bought at a yard sale for 50 cents to smack them. I am squeamish about seeing them so I cover the book in plastic grocery bags and tie them at the end. When I see a roach crawling on the floor, I just drop the book on it. I then let hubby deal with cleaning it up.

My Spring Garden has Sprung

I didn’t get any fall planting done last year since we had some unusually cold weather early in winter. Our last few winters have been very mild so I guess it was time for colder weather. Spring usually arrives in early February, but this year it waited until late March into early April. We got a late start on getting the garden tilled and amended. I also had to buy tomato and bell pepper transplants at my local nursery. We expanded the garden by several rows and planted new seeds this year. I finished planting all the April crops on Friday evening. Here is what we have planted this year: roma tomatoes, cucumbers, green/red/orange bell peppers, black beans, bush snap beans, zucchini, cow peas (similar to black eyed peas), sugar baby watermelons, and cantaloupe. I already see lots of cucumbers popping up. I also planted marigolds in between the tomato rows which helps to ward off caterpillars. I shall see how this does. I bought three more blueberry bushes which are all flowering. I will have lots of blackberries this year from all the buds and flowering on the bush. I’m very excited about my garden and very hopeful it will be plentiful. I included pictures below.

TMR Frugal Living Tip #72: Cut Face Wipes in Half!

Today’s thrifty living tip is to use a paste of baking soda to get stains out of plastic containers. It will also get out some funky smells. I use cold water to make a thick paste and let it soak overnight and rinse it out in cool water. You may need to do a second soaking but it usually gets out the stain on the first go rounds. Using hot water sets in the stains just like it will on your clothes. I wash it in warm water if the stain is out or mostly out.

Are You Ready for the Winter Heating Blues?

Each year I say I’m going to get my house more energy efficient for winter, but I end up procrastinating and do nothing. Then when I open my heating bills I want to cry. This year I am going to make my house more efficient so I can stop dreading the heating bill. I have a 55 year old house that comes with the original windows and doors which can get drafty. I did take down my doors to re-stain them, and filled in all the tiny hairline cracks. We had a nice cold front but I couldn’t feel any wind coming through like usual. Here is what I’m doing this weekend.

1) I am hanging thermal lined curtains in my living room. I eventually want them in the bedrooms we sleep in.

2) Installing door sweeps for all three doors.

3) Installing foam weather stripping for the windows. I also will caulk around the outside window casings and door frames.

4) I made a door draft guard for all three doors. We only use one of them on a regular basis. I will only put it in front of the door at night.

I spent under $200 for everything including the curtains. That was my biggest expense since I needed 8 panels for my living room. I didn’t want to use caulk on the window sills since we live in a warmer climate. Our winters aren’t very harsh so there are days I want to be able to open the windows to let in any nice air. That’s another reason why we didn’t want to put plastic wrap on the windows. I should be able to save at least 20% off my heating bill just doing these simple steps.

There are lots of ways to winterize your house. I don’t have to wrap or insulate pipes since we don’t get hard freezes and most of the time it’s only a day or two at a time. I don’t have a furnace or boiler so I don’t need to clean it out or make sure it’s in good working condition. I have a forced air natural gas heater so it’s minimal maintenance. Our attic is already well insulated, and we don’t have basements in Louisiana. You need to consider your winterizing needs which will depend on how cold your area gets. There is a lot of great information on the internet. I hope I gave you a few tips to consider so you don’t cry when you open your heating bills this winter.