DIY Dollar Store Decorations
February 16, 2016
Uncategorized

If there is one thing you might already know about me is that I LOVE a good bargain! I have complied 3 dollar store DIY decorating ideas. All of these can be used to decorate for a specific holiday or decorate your home as it is. I hope you enjoy!
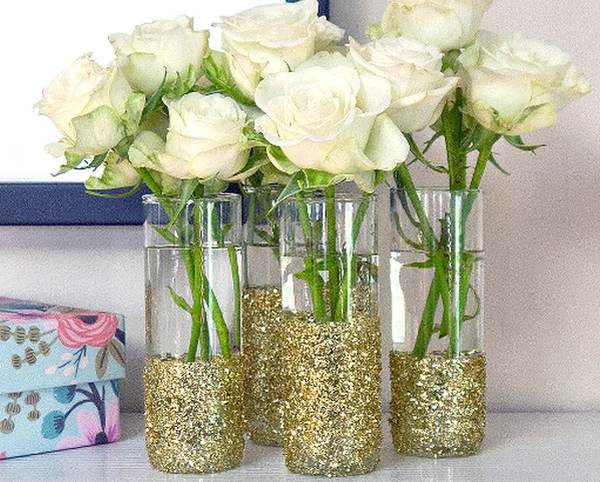
Glitter Vases
Supplies:
- Tall Vase
- Painter’s tape
- Mod Podge
- Paintbrush
- Glitter
- Sheet of scrap paper
- Clear glaze spray paint
Directions:
- Using painter’s tape, cover the parts of the vase that you want to remain clear and unglittered. Try mixing it up on each glass: you could cover half the glass, a third of the way from the bottom, or almost to the top of the vase. In addition, tape over the opening at the top of the vase, which keeps it protected later.
- Place a sheet of scrap paper over your work area, and sprinkle it with glitter. Now coat the uncovered part of the vase, except for the bottom, with Mod Podge. Roll it in the glitter, and then place it to the side while working on the other vases.
- After 20 minutes, touch up the glittered vases as needed, and let them dry for an additional 20 minutes. Take them outdoors or to a well-ventilated area, and cover your work surface with scrap paper. Use the clear glaze spray paint to coat the glitter in a protective coating. Let dry
- Remove the tape from vases, and enjoy the sparkle!

Silk Flower Push Pins
Supplies:
- Silk flowers
- Scissors
- Push pins
- Hot glue gun
Directions:
- Start by cutting away the flowers from the stems and then removing the center from the silk flower, reserving for later.
- Now press the flower over the push pin so the clear top pops out. Use a bit of hot glue to hold the flower in place.
- Top with the center that you removed from the silk flower with a dab of hot glue and your flower push pin is finished!
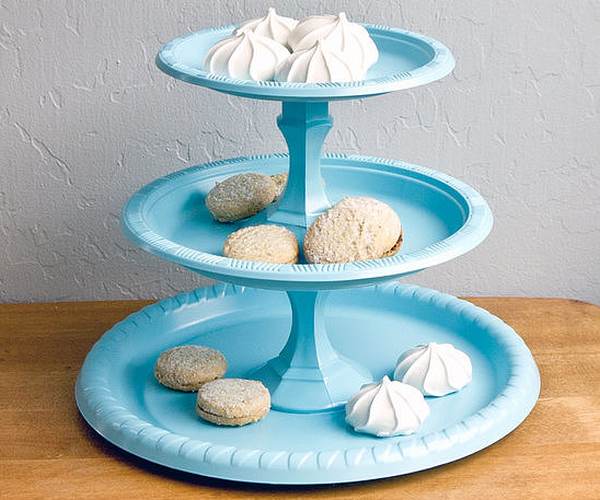
Tiered Platter
Supplies:
- Small, medium, and large plastic plates
- 2 glass candlesticks
- Super glue
- Ruler
- Permanent marker
- Paper towel
- Spray paint
- An old bedsheet or newspapers
Directions:
- Gather the materials and select three plastic plates: one small, medium, and large.
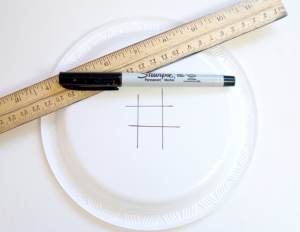
- Start with the medium-sized plate, eating surface-side up. Place the ruler across the center of the plate. Draw a line along each side of the ruler to create two horizontal lines bisecting the plate. Then, turn the plate 90 degrees, place the ruler across the center of the plate so it intersects the first two lines, and draw one line along both sides of the ruler. This will form a square guide on which to place the candlestick
- Place a light layer of super glue around the bottom of one of the candlesticks, and then press the glue-coated edge onto the plate, placing it over the square you drew.
- Repeat steps two and three with the largest tray, using a paper towel to remove any excess super glue if needed.
- Finally, flip the smallest-sized plate over to the noneating surface, and use the ruler to mark the middle, like the other plates.
- Now add a thin layer of glue to the top of the candlestick on the middle-sized plate and press to the base of the smallest plate over the square guidelines. Let set for a few minutes before moving on to the next step.
- To finish the tiered tray, coat the top of the candlestick on the largest tray with super glue, and center it atop the other two trays. Allow to set for a few minutes before the next step.
- Head outdoors and find a spot to spray paint the finished tray. Protect your lawn or driveway with several layers of newspaper or an old sheet, and lightly coat with spray paint. Once dry, touch up areas that were missed.
- Now your finished tiered tray is ready to use! Fill with sweet treats or small bites to display during your next gathering.
For more Dollar Store DIY’s click here! Thanks Popsugar!