I don’t know about you, but things at my house sometimes get done last minute! Nothing says “I love you” like quality time, craft time, and then decorating the house together too. It’s definitely not too late to get a garland or two draped on the mantle or on a bedroom door to capture the Valentine’s Day spirit! Wouldn’t it be sweet to craft, decorate, and then eat a Valentines meal with a decorated space? What a charming idea!! Just carve 30 minutes out of your busy schedule and make it happen!! Here are ideas to help you get started!!
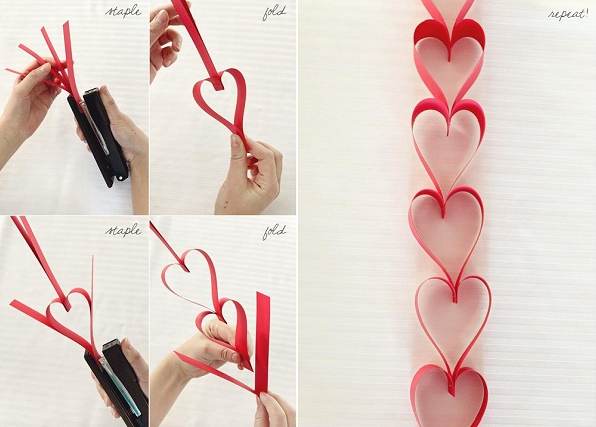
• colored paper
• stapler
• a ruler
• a pencil
• a paper cutter / sicssors
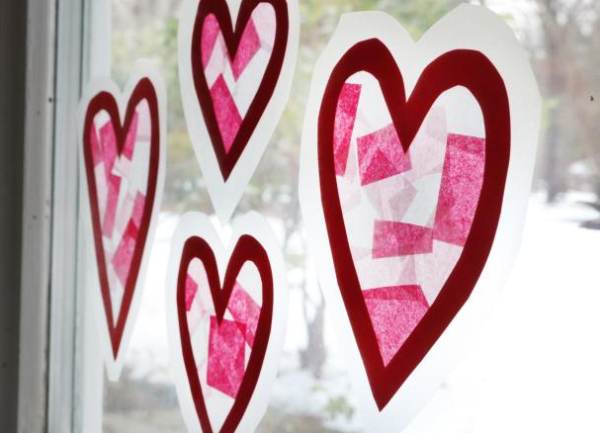
- scissors
- hole punch
- construction paper
- multicolor tissue paper
- transparent contact paper
- Cut hearts from of pieces of construction paper.
- Use a hole punch to create a starting point for removing the center of the heart.
- Trim pieces of multicolor tissue paper into small pieces.
- Remove the backing from the transparent contact paper to expose the adhesive side.
- Lay the contact paper smooth side down on a table, and position the red construction paper hearts on top of it. Make sure that the contact paper extends around the outside of the heart.
- Overlap pieces of tissue paper to the inside of the heart. The tissue paper will stick to the adhesive side of the contact paper.
- Trim excess contact paper from around the edge of the heart, leaving roughly 1/2” overhang.
- Apply the clings to a clean window and enjoy the light streaming through the transparent tissue paper.

- construction paper or cardstock
- yarn
- scissors
- hole punch
- Measure out the desired length of garland yarn. Cut the yarn and lay it out straight on a flat surface.
- Cut a heart out of construction paper or card stock. This will be your stencil.
- Trace and cut out as many hearts you will need to evenly space hearts down the length of the garland.
- Punch 2 holes in the arches of the hearts.
- Lace the yarn in the right hole and out the left hole. Slide the heart down the yarn toward the end of the garland.
- Repeat step 5 with desired amount of evenly spaced hearts.
- Repeat steps 1-6 three times with three different lengths of yarn. Trim the length yarn to adjust to space as needed.
- Hang for all to see!